Brother International NX-450Q Users Manual - English - Page 28
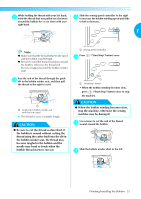
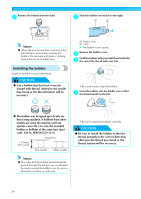
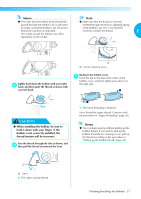
When installing the bobbin, be sure to, hold it down with your finger. If the, bobbin is
 |
View all Brother International NX-450Q manuals
Add to My Manuals
Save this manual to your list of manuals |
Page 28 highlights
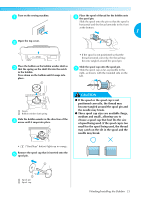
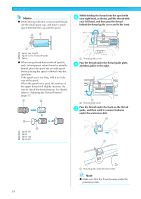
Memo z The order that the bobbin thread should be passed through the bobbin case is indicated by marks around the bobbin case. Be sure to thread the machine as indicated. The marks around the bobbin case differ depending on the model. Note z Make sure that the thread is correctly inserted through the tension-adjusting spring of the bobbin case. If it is not inserted correctly, reinsert the thread. 1 1 a Tension-adjusting spring Lightly hold down the bobbin with your right e hand, and then guide the thread as shown with your left hand. Reattach the bobbin cover. g Insert the tab in the lower-left corner of the bobbin cover, and then lightly press down on the right side. 2 CAUTION ● When installing the bobbin, be sure to hold it down with your finger. If the bobbin is not correctly installed, the thread tension will be incorrect. Pass the thread through the slot as shown, and f then pull the thread out toward the front. 1 X The lower threading is finished. Next, thread the upper thread. Continue with the procedure in "Upper Threading" (page 28). Memo z You can begin sewing without pulling up the bobbin thread. If you wish to pull up the bobbin thread before starting to sew, pull up the thread according to the procedure in "Pulling up the bobbin thread" (page 36). 1 a Cutter X The cutter cuts the thread. Winding/Installing the Bobbin 27
-
 1
1 -
2
-
3
-
4
-
5
-
6
-
7
-
8
-
9
-
10
-
11
-
12
-
13
-
14
-
15
-
16
-
17
-
18
-
19
-
20
-
21
-
22
-
 23
23 -
 24
24 -
 25
25 -
 26
26 -
 27
27 -
 28
28 -
 29
29 -
 30
30 -
 31
31 -
 32
32 -
 33
33 -
34
-
35
-
36
-
37
-
38
-
39
-
40
-
41
-
42
-
43
-
44
-
45
-
46
-
47
-
48
-
49
-
50
-
51
-
52
-
53
-
54
-
55
-
56
-
57
-
58
-
59
-
60
-
61
-
62
-
63
-
64
-
65
-
66
-
67
-
68
-
69
-
70
-
71
-
72
-
73
-
74
-
75
-
76
-
77
-
78
-
79
-
80
-
81
-
82
-
83
-
84
-
85
-
86
-
87
-
88
-
89
-
90
-
91
-
92
-
93
-
94
-
95
-
96
-
97
-
98
-
99
-
100
-
101
-
102
-
103
-
104
-
105
-
106
-
107
-
108
-
109
-
110
-
111
-
112
-
113
-
114
-
115
-
116
-
117
-
118
-
119
-
120
-
121
-
122
-
123
-
124
-
125
-
126
-
127
-
128
-
129
-
130
-
131
-
132
-
133
-
134
-
135
-
136
-
137
-
138
-
139
-
140
-
141
-
142
-
143
-
144
-
145
-
146
-
147
-
148
-
149
-
150
-
151
-
152
-
153
-
154
-
155
 |
 |
