Brother International NX-450Q Users Manual - English - Page 66
Useful Sewing Tips
 |
View all Brother International NX-450Q manuals
Add to My Manuals
Save this manual to your list of manuals |
Page 66 highlights
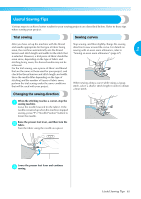
Useful Sewing Tips Various ways to achieve better results for your sewing projects are described below. Refer to these tips when sewing your project. Trial sewing Sewing curves After you have set up the machine with the thread Stop sewing, and then slightly change the sewing and needle appropriate for the type of fabric being sewn, the machine automatically sets the thread direction to sew around the curve. For details on sewing with an even seam allowance, refer to 2 tension and stitch length and width for the stitch that "Sewing an even seam allowance" (page 67). is selected. However, a trial piece of fabric should be sewn since, depending on the type of fabric and stitching being sewn, the desired results may not be achieved. For the trial sewing, use a piece of fabric and thread that are the same as those used for your project, and check the thread tension and stitch length and width. Since the results differ depending on the type of stitching and the number of layers of fabric sewn, perform the trial sewing under the same conditions that will be used with your project. When sewing along a curve while using a zigzag stitch, select a shorter stitch length in order to obtain a finer stitch. Changing the sewing direction When the stitching reaches a corner, stop the a sewing machine. Leave the needle lowered (in the fabric). If the needle remained up when the machine stopped sewing, press ("Needle Position" button) to lower the needle. Raise the presser foot lever, and then turn the b fabric. Turn the fabric using the needle as a pivot. Lower the presser foot lever and continue c sewing. Useful Sewing Tips 65
-
 1
1 -
2
-
3
-
4
-
5
-
6
-
7
-
8
-
9
-
10
-
11
-
12
-
13
-
14
-
15
-
16
-
17
-
18
-
19
-
20
-
21
-
22
-
23
-
24
-
25
-
26
-
27
-
28
-
29
-
30
-
31
-
32
-
33
-
34
-
35
-
36
-
37
-
38
-
39
-
40
-
41
-
42
-
43
-
44
-
45
-
46
-
47
-
48
-
49
-
50
-
51
-
52
-
53
-
54
-
55
-
56
-
57
-
58
-
59
-
60
-
 61
61 -
 62
62 -
 63
63 -
 64
64 -
 65
65 -
 66
66 -
 67
67 -
 68
68 -
 69
69 -
 70
70 -
 71
71 -
72
-
73
-
74
-
75
-
76
-
77
-
78
-
79
-
80
-
81
-
82
-
83
-
84
-
85
-
86
-
87
-
88
-
89
-
90
-
91
-
92
-
93
-
94
-
95
-
96
-
97
-
98
-
99
-
100
-
101
-
102
-
103
-
104
-
105
-
106
-
107
-
108
-
109
-
110
-
111
-
112
-
113
-
114
-
115
-
116
-
117
-
118
-
119
-
120
-
121
-
122
-
123
-
124
-
125
-
126
-
127
-
128
-
129
-
130
-
131
-
132
-
133
-
134
-
135
-
136
-
137
-
138
-
139
-
140
-
141
-
142
-
143
-
144
-
145
-
146
-
147
-
148
-
149
-
150
-
151
-
152
-
153
-
154
-
155
 |
 |
