Brother International NX-450Q Users Manual - English - Page 75
stitch length, etc.
 |
View all Brother International NX-450Q manuals
Add to My Manuals
Save this manual to your list of manuals |
Page 75 highlights
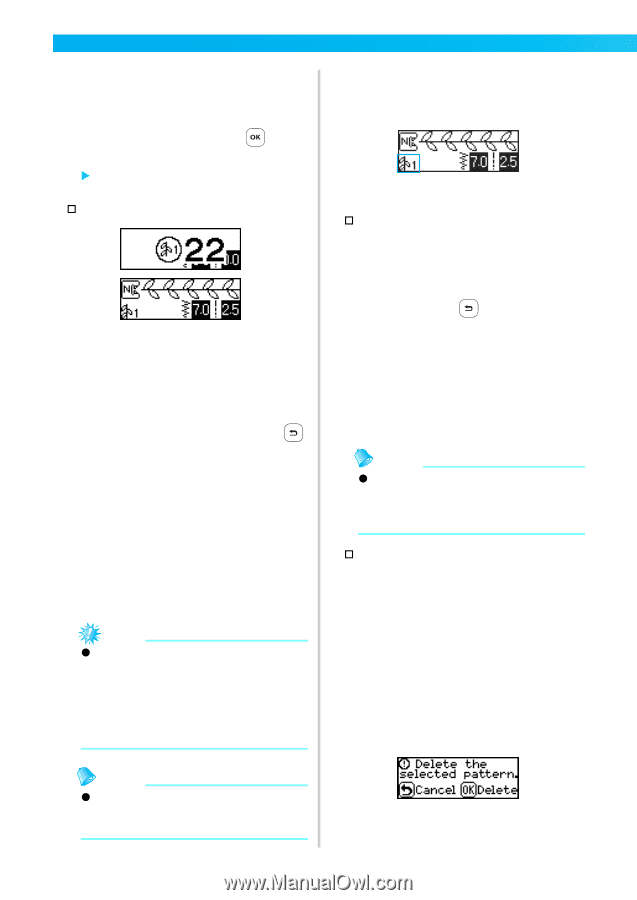
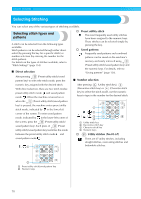
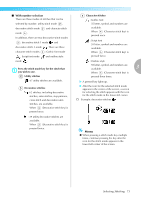
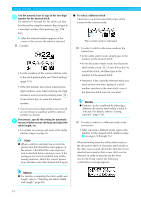
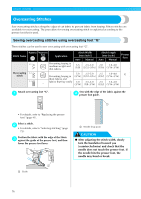
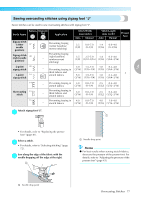
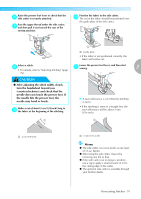
UTILITY STITCHES Use the numeric keys to type in the two-digit b number for the desired stitch. For stitches 01 through 09, the stitch can also be selected by using the numeric keys to type in a one-digit number, then pressing (OK key). X After the entered number appears in the center of the screen, the stitch is selected. † Example • For the numbers of the various stitches, refer to the stitch pattern plate and "Stitch Settings" (page 134). • If the first number (tens when entering twodigit numbers, ones when entering one-digit numbers) was incorrectly entered, press (Cancel/clear key) to erase the entered number. • If an incorrect two-digit number was entered, an error beep is sounded, and the entered number is cleared. If necessary, specify the setting for automatic f reverse/reinforcement stitching and adjust the stitch length, etc. • For details on sewing with each of the utility stitches, begin on page 76. Note z When a stitch is selected, the icon for the presser foot that should be used appears in the screen. Check that the correct presser foot is attached before starting to sew. If the wrong presser foot is installed, turn off the sewing machine, attach the correct presser foot, and then select the desired stitch again. ■ To select a different stitch Check the icon in the lower-left corner of the screen for the current mode. The current mode is indicated. † To select a stitch in the same mode as the current one • In the utility stitch mode, simply type in the number for the desired stitch. • In the decorative stitch mode and character stitch mode, press (Cancel/clear key) to cancel the stitch, and then type in the number for the desired stitch. • However, if the currently selected stitch was sewn at least one time, typing in a stitch number switches to the new stitch, even if the previous stitch was not canceled. Memo z Patterns can be combined by selecting a different decorative stitch while a stitch is selected. For details, refer to "Saving patterns" (page 126). † To select a stitch in a different mode as the current one • After selecting a different mode, type in the number for the desired stitch. (Refer to steps e on pages 72 through 74.) When switching from the utility stitch mode to the decorative stitch or character stitch mode or the other way around, all stitches that have been selected are erased so that a new stitch can be selected. In order to prevent stitches from incorrectly being erased, the following confirmation message appears. Memo z For details on adjusting the stitch width and length, refer to "Adjusting the Stitch Width and Length" (page 58). 74
-
 1
1 -
2
-
3
-
4
-
5
-
6
-
7
-
8
-
9
-
10
-
11
-
12
-
13
-
14
-
15
-
16
-
17
-
18
-
19
-
20
-
21
-
22
-
23
-
24
-
25
-
26
-
27
-
28
-
29
-
30
-
31
-
32
-
33
-
34
-
35
-
36
-
37
-
38
-
39
-
40
-
41
-
42
-
43
-
44
-
45
-
46
-
47
-
48
-
49
-
50
-
51
-
52
-
53
-
54
-
55
-
56
-
57
-
58
-
59
-
60
-
61
-
62
-
63
-
64
-
65
-
66
-
67
-
68
-
69
-
 70
70 -
 71
71 -
 72
72 -
 73
73 -
 74
74 -
 75
75 -
 76
76 -
 77
77 -
 78
78 -
 79
79 -
 80
80 -
81
-
82
-
83
-
84
-
85
-
86
-
87
-
88
-
89
-
90
-
91
-
92
-
93
-
94
-
95
-
96
-
97
-
98
-
99
-
100
-
101
-
102
-
103
-
104
-
105
-
106
-
107
-
108
-
109
-
110
-
111
-
112
-
113
-
114
-
115
-
116
-
117
-
118
-
119
-
120
-
121
-
122
-
123
-
124
-
125
-
126
-
127
-
128
-
129
-
130
-
131
-
132
-
133
-
134
-
135
-
136
-
137
-
138
-
139
-
140
-
141
-
142
-
143
-
144
-
145
-
146
-
147
-
148
-
149
-
150
-
151
-
152
-
153
-
154
-
155
 |
 |