Brother International ZE-856A Instruction Manual - English and Spanish - Page 217
Presser bar U and presser bar tip
 |
View all Brother International ZE-856A manuals
Add to My Manuals
Save this manual to your list of manuals |
Page 217 highlights
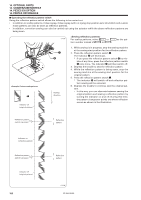
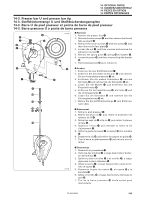
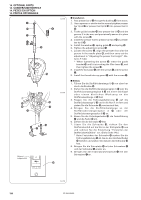
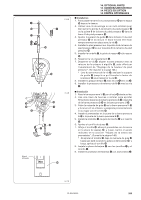
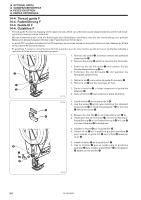
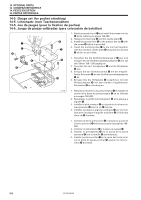
14. OPTIONAL PARTS 14. SONDERZUBEHÖRTEILE 14. PIECES EN OPTION 14. PARTES OPCIONALES 14-3. Presser bar U and presser bar tip 14-3. Stoffdrückerstange U und Stoffdrückerstangenspitze 14-3. Barre U de pied presseur et pointe de barre de pied presseur 14-3. Barra prensora U y punta de barra prensora i u y r 1401M I Removal e 1. Remove the presser foot q. 2. Remove the two screws w, and then remove the thread r take-up guard e. 3. Remove the seven screws r and the screw t, and then remove the face plate y. 4. Loosen the nut u, and then unscrew and remove the adjustment screw i. 5. Remove the spring guide o, spring !a0 nd washer !.1 6. Loosen the screw !,2 and then remove the guide bracket !.3 7. Pull the presser bar !4 up to remove it. r q o !0 !1 !3 !2 !4 w I Ausbau 1. Entfernen Sie den Stoffdrückerfuß q. 2. Entfernen Sie die beiden Schrauben w und nehmen Sie den Fadenabnahmeschutz e ab. t 3. Entfernen Sie die sieben Schrauben r und die Schraube t und nehmen Sie die Stirnplatte y ab. 4. Lösen Sie die Mutter u und entfernen Sie die Einstellschraube i. 5. Entfernen Sie die Federführung o, die Feder !0 und die Unterlegscheibe !.1 6. Lösen Sie die Schraube !2 und nehmen Sie die Führungshalterung !3 ab. 7. Ziehen Sie die Stoffdrückerstange !4 zum Entfernen nach oben. I Enlèvement 1. Retirer le pied presseur q. 2. Retirer les deux vis w, puis retirer le protecteur de releveur de fil e. 3. Retirer les sept vis r et la vis t, puis retirer la plaque de face y. 4. Desserrer l´écrou u, puis dévisser et retirer la vis d´ajustement i. 5. Retirer le guide de ressort o, le ressort !0 et la rondelle !.1 6. Desserrer la vis !,2 puis retirer le support du guide !.3 7. Tirer la barre du pied presseur !4 vers le haut pour la retirer. 1402M I Desmontaje 1. Desmonte el prensatelas q. 2. Quite los dos tornillos w, y luego desmonte el protec- tor del tirahilos e. 3. Quite los siete tornillos r y el tornillo t, y luego desmonte la placa delantera y. 4. Afloje la tuerca u, y luego desatornille y quite el tor- nillo de ajuste i. 5. Desmonte la guía de resorte o, el resorte !0 y la arandela !1. 6. Afloje el tornillo !,2 y luego desmonte la ménsula de guía !.3 7. Tire de la barra prensora !4 hacia arriba para desmontarla. ZE-855A,856A 198
-
 1
1 -
2
-
3
-
4
-
5
-
6
-
7
-
8
-
9
-
10
-
11
-
12
-
13
-
14
-
15
-
16
-
17
-
18
-
19
-
20
-
21
-
22
-
23
-
24
-
25
-
26
-
27
-
28
-
29
-
30
-
31
-
32
-
33
-
34
-
35
-
36
-
37
-
38
-
39
-
40
-
41
-
42
-
43
-
44
-
45
-
46
-
47
-
48
-
49
-
50
-
51
-
52
-
53
-
54
-
55
-
56
-
57
-
58
-
59
-
60
-
61
-
62
-
63
-
64
-
65
-
66
-
67
-
68
-
69
-
70
-
71
-
72
-
73
-
74
-
75
-
76
-
77
-
78
-
79
-
80
-
81
-
82
-
83
-
84
-
85
-
86
-
87
-
88
-
89
-
90
-
91
-
92
-
93
-
94
-
95
-
96
-
97
-
98
-
99
-
100
-
101
-
102
-
103
-
104
-
105
-
106
-
107
-
108
-
109
-
110
-
111
-
112
-
113
-
114
-
115
-
116
-
117
-
118
-
119
-
120
-
121
-
122
-
123
-
124
-
125
-
126
-
127
-
128
-
129
-
130
-
131
-
132
-
133
-
134
-
135
-
136
-
137
-
138
-
139
-
140
-
141
-
142
-
143
-
144
-
145
-
146
-
147
-
148
-
149
-
150
-
151
-
152
-
153
-
154
-
155
-
156
-
157
-
158
-
159
-
160
-
161
-
162
-
163
-
164
-
165
-
166
-
167
-
168
-
169
-
170
-
171
-
172
-
173
-
174
-
175
-
176
-
177
-
178
-
179
-
180
-
181
-
182
-
183
-
184
-
185
-
186
-
187
-
188
-
189
-
190
-
191
-
192
-
193
-
194
-
195
-
196
-
197
-
198
-
199
-
200
-
201
-
202
-
203
-
204
-
205
-
206
-
207
-
208
-
209
-
210
-
211
-
 212
212 -
 213
213 -
 214
214 -
 215
215 -
 216
216 -
 217
217 -
 218
218 -
 219
219 -
 220
220 -
 221
221 -
 222
222 -
223
-
224
-
225
-
226
-
227
-
228
-
229
-
230
-
231
-
232
-
233
-
234
-
235
-
236
-
237
-
238
-
239
-
240
-
241
-
242
-
243
-
244
-
245
-
246
-
247
-
248
 |
 |
