Brother International ZE-856A Instruction Manual - English and Spanish - Page 90
Setting the sewing pattern
 |
View all Brother International ZE-856A manuals
Add to My Manuals
Save this manual to your list of manuals |
Page 90 highlights
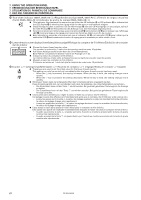
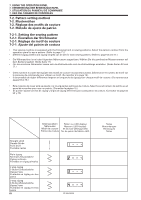
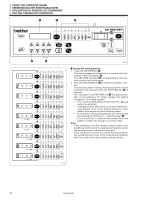
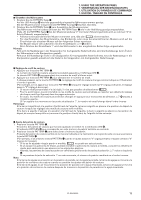
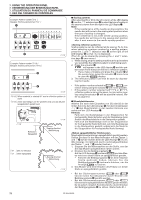
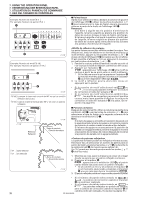
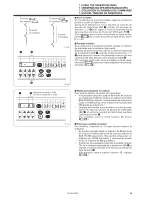
7. USING THE OPERATION PANEL 7. VERWENDUNG DER BEDIENUNGSTAFEL 7. UTILISATION DU PANNEAU DE COMMANDE 7. USO DEL TABLERO DE CONTROLES w q e r t (1~8) (1~8) (1~99) (1~99) (1~99) 1433M I Setting the sewing pattern 1. Press the PATTERN key q. The sewing pattern number that is currently set is displayed in the LED display w. The PATTERN indicator e corresponding to this pattern number also illuminates. 2. Press the PATTERN key q to select the pattern number. The sewing pattern setting changes as shown in the illustration at left each time the PATTERN key q is pressed. (For example, if the PATTERN key q is pressed when the current setting is "2" (plain zigzag), the setting changes to "3" (2-step zigzag).) • If no custom-made patterns have been set, AAAAA cannot be selected. • If setting scallop, blind stitch or custom-made sew- ing patterns, refer to the setting details for each pattern that appear on the following pages. • Furthermore, the sewing patterns can be changed by pressing the leftmost ĦĤ selection keys r. If you press the Ĥ selection key at this time, the pattern number will change in reverse order. Note: If the needle bar is at the needle up stop position, the needle bar will move to the sewing start position when the sewing pattern settings are changed. If the needle bar is not at the needle up stop position, the needle bar will move to the sewing start position after it next moves to the needle up stop position. 1434M 71 ZE-855A,856A
-
 1
1 -
2
-
3
-
4
-
5
-
6
-
7
-
8
-
9
-
10
-
11
-
12
-
13
-
14
-
15
-
16
-
17
-
18
-
19
-
20
-
21
-
22
-
23
-
24
-
25
-
26
-
27
-
28
-
29
-
30
-
31
-
32
-
33
-
34
-
35
-
36
-
37
-
38
-
39
-
40
-
41
-
42
-
43
-
44
-
45
-
46
-
47
-
48
-
49
-
50
-
51
-
52
-
53
-
54
-
55
-
56
-
57
-
58
-
59
-
60
-
61
-
62
-
63
-
64
-
65
-
66
-
67
-
68
-
69
-
70
-
71
-
72
-
73
-
74
-
75
-
76
-
77
-
78
-
79
-
80
-
81
-
82
-
83
-
84
-
 85
85 -
 86
86 -
 87
87 -
 88
88 -
 89
89 -
 90
90 -
 91
91 -
 92
92 -
 93
93 -
 94
94 -
 95
95 -
96
-
97
-
98
-
99
-
100
-
101
-
102
-
103
-
104
-
105
-
106
-
107
-
108
-
109
-
110
-
111
-
112
-
113
-
114
-
115
-
116
-
117
-
118
-
119
-
120
-
121
-
122
-
123
-
124
-
125
-
126
-
127
-
128
-
129
-
130
-
131
-
132
-
133
-
134
-
135
-
136
-
137
-
138
-
139
-
140
-
141
-
142
-
143
-
144
-
145
-
146
-
147
-
148
-
149
-
150
-
151
-
152
-
153
-
154
-
155
-
156
-
157
-
158
-
159
-
160
-
161
-
162
-
163
-
164
-
165
-
166
-
167
-
168
-
169
-
170
-
171
-
172
-
173
-
174
-
175
-
176
-
177
-
178
-
179
-
180
-
181
-
182
-
183
-
184
-
185
-
186
-
187
-
188
-
189
-
190
-
191
-
192
-
193
-
194
-
195
-
196
-
197
-
198
-
199
-
200
-
201
-
202
-
203
-
204
-
205
-
206
-
207
-
208
-
209
-
210
-
211
-
212
-
213
-
214
-
215
-
216
-
217
-
218
-
219
-
220
-
221
-
222
-
223
-
224
-
225
-
226
-
227
-
228
-
229
-
230
-
231
-
232
-
233
-
234
-
235
-
236
-
237
-
238
-
239
-
240
-
241
-
242
-
243
-
244
-
245
-
246
-
247
-
248
 |
 |
