Brother International ZE-856A Instruction Manual - English and Spanish - Page 40
Installing the belt cover, 10. Montage des Riemenschutzes, 10. Installation du couvercle de
 |
View all Brother International ZE-856A manuals
Add to My Manuals
Save this manual to your list of manuals |
Page 40 highlights
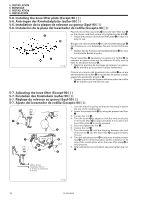
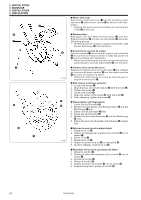
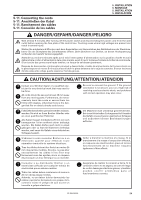
5. INSTALLATION 5. MONTAGE 5. INSTALLATION 5. INSTALACION 5-10. Installing the belt cover 5-10. Montage des Riemenschutzes 5-10. Installation du couvercle de courroie 5-10. Instalación de la cubierta de la correa I Machine belt cover I Riemenschutz I Couvercle de courroie de machine I Cubierta de la correa de la máquina 1. Pass the cords q down through the hole in the work table. 1. Führen Sie die Kabel q durch das Nähtischloch. 1. Passer les cordons q vers le bas à travers le trou de la table de travail. 1. Pasar los cables q hacia abajo en el agujero de la mesa de trabajo. q w y 5 - 6mm w 21 1283M w e r 2. Tilt back the machine head. 3. Fit the belt cover w onto the machine pulley e, and tighten it with the three screws r as shown in the illustration. 2. Klappen Sie das Maschinenoberteil nach hinten. 3. Bringen Sie den Riemenschutz wan der Riemenscheibe e an und ziehen Sie die drei Schrauben r wie in der Abbildung gezeigt an. 2. Incliner la tête de machine vers l'arrière. 3. Placer le couvercle de courroie w sur la poulie de ma- chine e, et le serrer à l'aide des trois vis r, comme indiqué sur l'illustration. 2. Inclinar hacia atrás la cabeza de la máquina. 3. Encajar la cubierta de la correa w en la polea de la máquina e, y apretarla con tres tornillos r tal como se indica en la figura. 1284M 1285M 4. Return the machine head to the upright position. 5. Insert belt cover D t into the belt cover w so that there is an overlap of 5 to 6 mm and so that the sides of belt cover D t do not touch the belt cover w. Then provisionally secure belt cover D t with the two screws y. 4. Klappen Sie das Maschinenoberteil wieder zurück. 5. S t e c k e n S e i d e n R i e m e n s c h u t z D t i n d e n Riemenschutz w, so daß eine Überlappung von 5 bis 6 mm vorhanden ist und sich die Seiten des y Riemenschutzes D t und w nicht berühren. Befestigen Sie den Riemenschutz D t provisorisch mit den beiden Schrauben y. 4. Remettre la tête de machine en position verticale. 5. Insérer le couvercle de courroie D t dans le couvercle de courroie w de manière qu'ils se chevauchent sur 5 à 6 mm et que les côtés du couvercle de courroie D t t n'entrent pas en contact avec le couvercle de courroie w. Ensuite, serrer provisoirement le couvercle de courroie D t à l'aide des deux vis y. t 0543M 4. Volver la cabeza de la máquina a su posición derecha. 5. Insertar la cubierta de la correa D t en la cubierta de la correa w de manera que se superponga 5 a 6 mm y de manera que los lados de la cubierta de la correa D t no toquen la cubierta de la correa w. Luego asegurar provisoriamente la cubierta de la correa D t con los dos tornillos y. ZE-855A,856A
-
 1
1 -
2
-
3
-
4
-
5
-
6
-
7
-
8
-
9
-
10
-
11
-
12
-
13
-
14
-
15
-
16
-
17
-
18
-
19
-
20
-
21
-
22
-
23
-
24
-
25
-
26
-
27
-
28
-
29
-
30
-
31
-
32
-
33
-
34
-
 35
35 -
 36
36 -
 37
37 -
 38
38 -
 39
39 -
 40
40 -
 41
41 -
 42
42 -
 43
43 -
 44
44 -
 45
45 -
46
-
47
-
48
-
49
-
50
-
51
-
52
-
53
-
54
-
55
-
56
-
57
-
58
-
59
-
60
-
61
-
62
-
63
-
64
-
65
-
66
-
67
-
68
-
69
-
70
-
71
-
72
-
73
-
74
-
75
-
76
-
77
-
78
-
79
-
80
-
81
-
82
-
83
-
84
-
85
-
86
-
87
-
88
-
89
-
90
-
91
-
92
-
93
-
94
-
95
-
96
-
97
-
98
-
99
-
100
-
101
-
102
-
103
-
104
-
105
-
106
-
107
-
108
-
109
-
110
-
111
-
112
-
113
-
114
-
115
-
116
-
117
-
118
-
119
-
120
-
121
-
122
-
123
-
124
-
125
-
126
-
127
-
128
-
129
-
130
-
131
-
132
-
133
-
134
-
135
-
136
-
137
-
138
-
139
-
140
-
141
-
142
-
143
-
144
-
145
-
146
-
147
-
148
-
149
-
150
-
151
-
152
-
153
-
154
-
155
-
156
-
157
-
158
-
159
-
160
-
161
-
162
-
163
-
164
-
165
-
166
-
167
-
168
-
169
-
170
-
171
-
172
-
173
-
174
-
175
-
176
-
177
-
178
-
179
-
180
-
181
-
182
-
183
-
184
-
185
-
186
-
187
-
188
-
189
-
190
-
191
-
192
-
193
-
194
-
195
-
196
-
197
-
198
-
199
-
200
-
201
-
202
-
203
-
204
-
205
-
206
-
207
-
208
-
209
-
210
-
211
-
212
-
213
-
214
-
215
-
216
-
217
-
218
-
219
-
220
-
221
-
222
-
223
-
224
-
225
-
226
-
227
-
228
-
229
-
230
-
231
-
232
-
233
-
234
-
235
-
236
-
237
-
238
-
239
-
240
-
241
-
242
-
243
-
244
-
245
-
246
-
247
-
248
 |
 |
