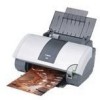
Canon 8538A001 i960 Quick Start Guide - Page 28
Printing on Photo Paper Using the Photo Paper Tray
 |
UPC - 013803025880
View all Canon 8538A001 manuals
Add to My Manuals
Save this manual to your list of manuals |
Page 28 highlights
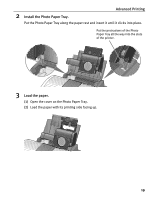
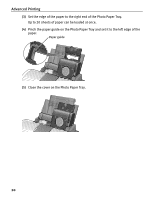
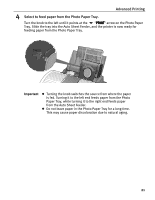
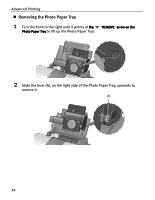
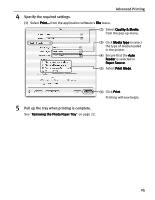
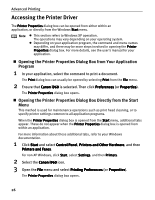
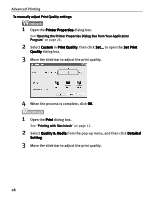
Advanced Printing „ Printing on Photo Paper Using the Photo Paper Tray Up to 20 sheets of the 4" x 6" size photo paper can be loaded through the Photo Paper Tray. 1 Turn the knob on the Photo Paper Tray to the left until it points at the "PRINT" arrow on the Photo Paper Tray. Slide the tray into the Auto Sheet Feeder. 2 Create a document or open a file to print. 3 Open the Printer Properties dialog box. 4 Specify the required settings. (1) Click Media Type to select the type of media loaded in the printer. (2) Ensure that the Auto Sheet Feeder is selected in Paper Source. (3) Set the custom print quality if required. Note Click the Page Setup tab to select the 4" x 6". (4) Click OK. The Print dialog box opens. 5 Start printing. (1) Click Print or OK. 6 Pull up the tray when printing is complete. See "Removing the Photo Paper Tray" on page 22. 23
-
 1
1 -
2
-
3
-
4
-
5
-
6
-
7
-
8
-
9
-
10
-
11
-
12
-
13
-
14
-
15
-
16
-
17
-
18
-
19
-
20
-
21
-
22
-
 23
23 -
 24
24 -
 25
25 -
 26
26 -
 27
27 -
 28
28 -
 29
29 -
 30
30 -
 31
31 -
 32
32 -
 33
33 -
34
-
35
-
36
-
37
-
38
-
39
-
40
-
41
-
42
-
43
-
44
-
45
-
46
-
47
-
48
-
49
-
50
-
51
-
52
-
53
-
54
-
55
-
56
-
57
-
58
-
59
-
60
-
61
-
62
-
63
-
64
-
65
-
66
-
67
-
68
-
69
-
70
-
71
-
72
-
73
-
74
-
75
-
76
-
77
-
78
-
79
-
80
-
81
-
82
-
83
-
84
-
85
-
86
-
87
-
88
-
89
-
90
-
91
-
92
 |
 |
