Canon CR-N500 Remote Camera Settings Guide - Page 17
Initial Camera Settings, Settings using the Camera Search Tool
 |
View all Canon CR-N500 manuals
Add to My Manuals
Save this manual to your list of manuals |
Page 17 highlights
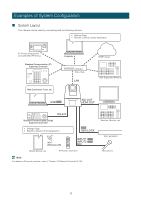
Initial Camera Settings In order to use the camera, it is necessary to first connect the computer to the camera via network then set the Administrator Account. Settings using the Camera Search Tool Here, by using the camera search tool and accessing the camera's initial settings screen, the method to initialize the camera to the factory default settings is explained. Camera detection by this tool is valid only for cameras in the same network. 1 Connect the camera to the computer on the same network, then turn on the power. 2 Double click [CameraSearchTool.exe] downloaded from the website. When starting this tool, cameras on the same network are automatically detected and the acquired information is displayed in a list. In the case the camera is not automatically detected, click [Search Camera]. Note • Even if the network addresses of the computer and the camera are different, if IPv6 of the computer is enabled, the camera will be detected using the IPv6 link-local address. • If IPv6 is not available, either assign an IPv4 address on the DHCP server or use the AutoIP feature to detect the camera. To use the AutoIP function, set the computer to [Automatically obtain IP address] in the Windows network settings, and connect the computer and camera to a network environment without a DHCP server. Each computer and camera will be assigned an IPv4 link-local address of 169.254.xxx.xxx and will belong to the same network, so the camera can be detected. 3 Click the IP address of the camera to be initialized The web browser starts and the [Default Settings (1/2)] screen of the camera is displayed. 17
-
 1
1 -
2
-
3
-
4
-
5
-
6
-
7
-
8
-
9
-
10
-
11
-
 12
12 -
 13
13 -
 14
14 -
 15
15 -
 16
16 -
 17
17 -
 18
18 -
 19
19 -
 20
20 -
 21
21 -
 22
22 -
23
-
24
-
25
-
26
-
27
-
28
-
29
-
30
-
31
-
32
-
33
-
34
-
35
-
36
-
37
-
38
-
39
-
40
-
41
-
42
-
43
-
44
-
45
-
46
-
47
-
48
-
49
-
50
-
51
-
52
-
53
-
54
-
55
-
56
-
57
-
58
-
59
-
60
-
61
-
62
-
63
-
64
-
65
-
66
-
67
-
68
-
69
-
70
-
71
-
72
-
73
-
74
-
75
-
76
-
77
-
78
-
79
-
80
-
81
-
82
-
83
-
84
-
85
-
86
-
87
-
88
-
89
-
90
-
91
-
92
-
93
-
94
-
95
-
96
-
97
-
98
-
99
-
100
-
101
-
102
-
103
-
104
-
105
-
106
-
107
-
108
-
109
-
110
-
111
-
112
-
113
-
114
-
115
-
116
-
117
-
118
-
119
 |
 |
