Canon PIXMA MP470 MP470 series Quick Start Guide - Page 48
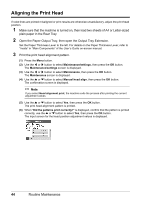
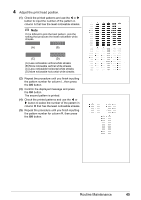
Aligning the Print Head
 |
View all Canon PIXMA MP470 manuals
Add to My Manuals
Save this manual to your list of manuals |
Page 48 highlights
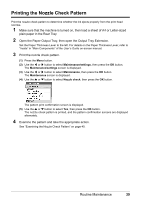
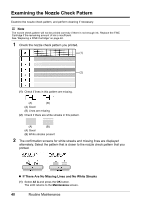
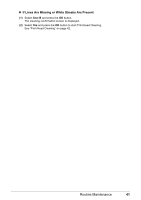
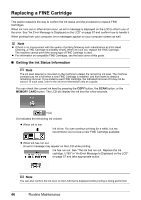
Aligning the Print Head If ruled lines are printed misaligned or print results are otherwise unsatisfactory, adjust the print head position. 1 Make sure that the machine is turned on, then load two sheets of A4 or Letter-sized plain paper in the Rear Tray. 2 Open the Paper Output Tray, then open the Output Tray Extension. Set the Paper Thickness Lever to the left. For details on the Paper Thickness Lever, refer to "Inside" in "Main Components" of the User's Guide on-screen manual. 3 Print the print head alignment pattern. (1) Press the Menu button. (2) Use the [ or ] button to select Maintenance/settings, then press the OK button. The Maintenance/settings screen is displayed. (3) Use the [ or ] button to select Maintenance, then press the OK button. The Maintenance screen is displayed. (4) Use the { or } button to select Manual head align, then press the OK button. The confirmation screen is displayed. Note If you select Head alignment print, the machine exits the process after printing the current adjustment values. (5) Use the { or } button to select Yes, then press the OK button. The print head alignment pattern is printed. (6) When "Did the patterns print correctly?" is displayed, confirm that the pattern is printed correctly, use the { or } button to select Yes, then press the OK button. The input screen for the head position adjustment values is displayed. 44 Routine Maintenance
-
 1
1 -
2
-
3
-
4
-
5
-
6
-
7
-
8
-
9
-
10
-
11
-
12
-
13
-
14
-
15
-
16
-
17
-
18
-
19
-
20
-
21
-
22
-
23
-
24
-
25
-
26
-
27
-
28
-
29
-
30
-
31
-
32
-
33
-
34
-
35
-
36
-
37
-
38
-
39
-
40
-
41
-
42
-
 43
43 -
 44
44 -
 45
45 -
 46
46 -
 47
47 -
 48
48 -
 49
49 -
 50
50 -
 51
51 -
 52
52 -
 53
53 -
54
-
55
-
56
-
57
-
58
-
59
-
60
-
61
-
62
-
63
-
64
-
65
-
66
-
67
-
68
-
69
-
70
-
71
-
72
-
73
-
74
-
75
-
76
-
77
-
78
-
79
-
80
-
81
-
82
-
83
-
84
-
85
-
86
-
87
-
88
-
89
-
90
-
91
-
92
 |
 |
