Canon PIXMA iP1500 iP1500 Quick Start Guide - Page 61
Appendix - mac os x
 |
View all Canon PIXMA iP1500 manuals
Add to My Manuals
Save this manual to your list of manuals |
Page 61 highlights
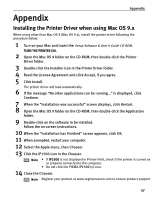
Appendix Appendix Installing the Printer Driver when using Mac OS 9.x When using other than Mac OS X (Mac OS 9.x), install the printer driver following the procedure below. 1 Turn on your Mac and insert the Setup Software & User's Guide CD-ROM. TURN THE PRINTER ON. 2 Open the Mac OS 9 folder on the CD-ROM, then double-click the Printer Driver folder. 3 Double-click the Installer icon in the Printer Driver folder. 4 Read the License Agreement and click Accept, if you agree. 5 Click Install. The printer driver will load automatically. 6 If the message "No other applications can be running..." is displayed, click Continue. 7 When the "Installation was successful" screen displays, click Restart. 8 Open the Mac OS 9 folder on the CD-ROM, then double-click the Application folder. 9 Double-click on the software to be installed. Follow the on-screen instructions. 10 When the "Installation has Finished" screen appears, click OK. 11 When prompted, restart your computer. 12 Select the Apple menu, then Chooser. 13 Click the iP1500 icon in the Chooser. Note • If iP1500 is not displayed in Printer field, check if the printer is turned on or properly connected to the computer. • Do not click the PIXMA iP1500 (s) icon. 14 Close the Chooser. Note Register your product at www.registercanon.com to ensure product support. 57
-
 1
1 -
2
-
3
-
4
-
5
-
6
-
7
-
8
-
9
-
10
-
11
-
12
-
13
-
14
-
15
-
16
-
17
-
18
-
19
-
20
-
21
-
22
-
23
-
24
-
25
-
26
-
27
-
28
-
29
-
30
-
31
-
32
-
33
-
34
-
35
-
36
-
37
-
38
-
39
-
40
-
41
-
42
-
43
-
44
-
45
-
46
-
47
-
48
-
49
-
50
-
51
-
52
-
53
-
54
-
55
-
 56
56 -
 57
57 -
 58
58 -
 59
59 -
 60
60 -
 61
61 -
 62
62 -
 63
63 -
 64
64 -
 65
65 -
 66
66 -
67
-
68
-
69
-
70
-
71
-
72
-
73
-
74
-
75
-
76
 |
 |