Canon PIXMA iP6220D iP6220D Direct Printing Guide - Page 50
Setting up the Card Slot as the Memory Card Drive of, the Computer - windows 8
 |
View all Canon PIXMA iP6220D manuals
Add to My Manuals
Save this manual to your list of manuals |
Page 50 highlights
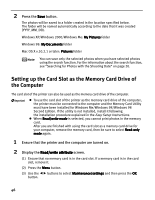
2 Press the Save button. The photos will be saved to a folder created in the location specified below. The folder will be named automatically according to the date that it was created (YYYY_MM_DD). Windows XP/Windows 2000/Windows Me: My Pictures folder Windows 98: My Documents folder Mac OS X v.10.2.1 or later: Pictures folder You can save only the selected photos when you have selected photos using the search function. For the information about the search function, see "Searching for Photos with the Shooting Date" on page 20. Setting up the Card Slot as the Memory Card Drive of the Computer The card slot of the printer can also be used as the memory card drive of the computer. To use the card slot of the printer as the memory card drive of the computer, the printer must be connected to the computer and the Memory Card Utility must have been installed for Windows Me/Windows 98/Windows 98 Second Edition. If the utility is not installed, install it following the installation procedure explained in the Easy Setup Instructions. When Read/write mode is selected, you cannot print photos in the memory card. After you are finished with using the card slot as a memory card drive for your computer, remove the memory card, then be sure to select Read-only mode again. 1 Ensure that the printer and the computer are turned on. 2 Display the Read/write attribute screen. (1) Ensure that no memory card is in the card slot. If a memory card is in the card slot, remove it. (2) Press the Menu button. (3) Use the button. buttons to select Maintenance/settings and then press the OK 46
-
 1
1 -
2
-
3
-
4
-
5
-
6
-
7
-
8
-
9
-
10
-
11
-
12
-
13
-
14
-
15
-
16
-
17
-
18
-
19
-
20
-
21
-
22
-
23
-
24
-
25
-
26
-
27
-
28
-
29
-
30
-
31
-
32
-
33
-
34
-
35
-
36
-
37
-
38
-
39
-
40
-
41
-
42
-
43
-
44
-
 45
45 -
 46
46 -
 47
47 -
 48
48 -
 49
49 -
 50
50 -
 51
51 -
 52
52 -
 53
53 -
 54
54 -
 55
55 -
56
-
57
-
58
-
59
-
60
-
61
-
62
-
63
-
64
-
65
-
66
-
67
-
68
-
69
-
70
-
71
-
72
-
73
-
74
-
75
-
76
 |
 |
