Canon PIXMA iP6220D iP6220D Direct Printing Guide - Page 57
Aligning Print Head - Auto head align
 |
View all Canon PIXMA iP6220D manuals
Add to My Manuals
Save this manual to your list of manuals |
Page 57 highlights
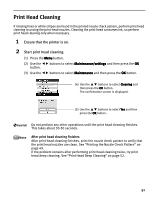
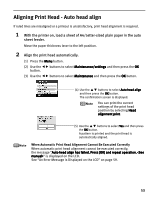
Aligning Print Head - Auto head align If ruled lines are misaligned or a printout is unsatisfactory, print head alignment is required. 1 With the printer on, load a sheet of A4/Letter-sized plain paper in the auto sheet feeder. Move the paper thickness lever to the left position. 2 Align the print head automatically. (1) Press the Menu button. (2) Use the button. buttons to select Maintenance/settings and then press the OK (3) Use the buttons to select Maintenance and then press the OK button. (4) Use the buttons to select Auto head align and then press the OK button. The confirmation screen is displayed. You can print the current settings of the print head position by selecting Head alignment print. (5) Use the buttons to select Yes and then press the OK button. A pattern is printed and the print head is automatically aligned. When Automatic Print Head Alignment Cannot Be Executed Correctly When automatic print head alignment cannot be executed correctly, the message "Auto head align has failed. Press [OK] and repeat operation. " is displayed on the LCD. See "An Error Message is Displayed on the LCD" on page 59. 53
-
 1
1 -
2
-
3
-
4
-
5
-
6
-
7
-
8
-
9
-
10
-
11
-
12
-
13
-
14
-
15
-
16
-
17
-
18
-
19
-
20
-
21
-
22
-
23
-
24
-
25
-
26
-
27
-
28
-
29
-
30
-
31
-
32
-
33
-
34
-
35
-
36
-
37
-
38
-
39
-
40
-
41
-
42
-
43
-
44
-
45
-
46
-
47
-
48
-
49
-
50
-
51
-
 52
52 -
 53
53 -
 54
54 -
 55
55 -
 56
56 -
 57
57 -
 58
58 -
 59
59 -
 60
60 -
 61
61 -
 62
62 -
63
-
64
-
65
-
66
-
67
-
68
-
69
-
70
-
71
-
72
-
73
-
74
-
75
-
76
 |
 |
