Canon XF305 XF305 / XF300 Instruction Manual - Page 32
Attaching the Lens Hood, Attaching and Detaching the Eye Cup
 |
View all Canon XF305 manuals
Add to My Manuals
Save this manual to your list of manuals |
Page 32 highlights
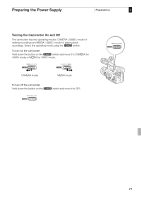
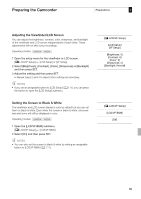
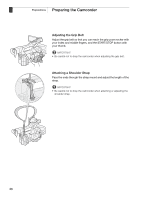
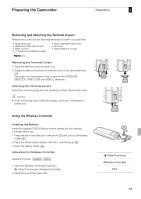
2 Preparations Preparing the Camcorder Preparing the Camcorder ባ ቢ This section outlines the basic preparations for the camcorder such as attaching the lens hood, attaching/removing the eyecup, and adjusting the viewfinder and LCD screen. Attaching the Lens Hood Attach the lens hood to protect the lens and reduce the amount of stray light that may hit the lens. 1 Place the lens hood on the front of the lens so that the window for the external Instant AF sensor faces down (ቢ) and turn it 90 degrees clockwise (ባ). • Be careful not to deform the lens hood. • Make sure that the lens hood is aligned with the thread. 2 Tighten the lock screw (ቤ). ቤ Attaching and Detaching the Eye Cup Attaching the Eye Cup Attach the eye cup so that it covers the rubber portion of the viewfinder unit. • The dioptric adjustment lever can be operated even with the eye cup attached. • For left eye use, attach the eye cup so that the protruding portion faces the opposite side. 32
-
 1
1 -
2
-
3
-
4
-
5
-
6
-
7
-
8
-
9
-
10
-
11
-
12
-
13
-
14
-
15
-
16
-
17
-
18
-
19
-
20
-
21
-
22
-
23
-
24
-
25
-
26
-
 27
27 -
 28
28 -
 29
29 -
 30
30 -
 31
31 -
 32
32 -
 33
33 -
 34
34 -
 35
35 -
 36
36 -
 37
37 -
38
-
39
-
40
-
41
-
42
-
43
-
44
-
45
-
46
-
47
-
48
-
49
-
50
-
51
-
52
-
53
-
54
-
55
-
56
-
57
-
58
-
59
-
60
-
61
-
62
-
63
-
64
-
65
-
66
-
67
-
68
-
69
-
70
-
71
-
72
-
73
-
74
-
75
-
76
-
77
-
78
-
79
-
80
-
81
-
82
-
83
-
84
-
85
-
86
-
87
-
88
-
89
-
90
-
91
-
92
-
93
-
94
-
95
-
96
-
97
-
98
-
99
-
100
-
101
-
102
-
103
-
104
-
105
-
106
-
107
-
108
-
109
-
110
-
111
-
112
-
113
-
114
-
115
-
116
-
117
-
118
-
119
-
120
-
121
-
122
-
123
-
124
-
125
-
126
-
127
-
128
-
129
-
130
-
131
-
132
-
133
-
134
-
135
-
136
-
137
-
138
-
139
-
140
-
141
-
142
-
143
-
144
-
145
-
146
-
147
-
148
-
149
-
150
-
151
-
152
-
153
-
154
-
155
-
156
-
157
-
158
-
159
-
160
-
161
-
162
-
163
-
164
-
165
-
166
-
167
-
168
-
169
-
170
-
171
-
172
-
173
-
174
-
175
-
176
-
177
-
178
-
179
-
180
-
181
-
182
-
183
-
184
-
185
-
186
-
187
-
188
-
189
-
190
-
191
-
192
-
193
-
194
-
195
-
196
-
197
-
198
-
199
-
200
-
201
-
202
-
203
-
204
-
205
-
206
-
207
-
208
 |
 |
