Canon XF305 XF305 / XF300 Instruction Manual - Page 70
Adjusting the Aperture
 |
View all Canon XF305 manuals
Add to My Manuals
Save this manual to your list of manuals |
Page 70 highlights
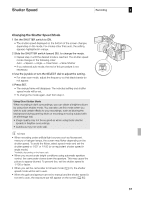
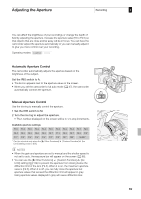
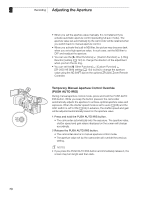
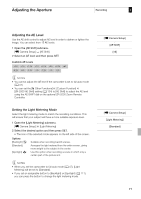
3 Recording Adjusting the Aperture • When you set the aperture value manually, it is not retained if you activate automatic aperture control (excluding full auto mode). The aperture value set automatically by the camcorder will be retained when you switch back to manual aperture control. • When you activate the built-in ND filter, the picture may become dark when you set a high aperture value. In such case, set the ND filter to OFF and readjust the aperture. • You can use the [J Other Functions] [Custom Function] [I. Ring Direction] setting (0 124) to change the direction of the adjustment when you turn the iris ring. • You can set the [J Other Functions] [Custom Function] [ZR-2000 AE Shift] setting (0 124) to [Iris] to change the aperture value using the AE SHIFT dial on the optional ZR-2000 Zoom Remote Controller. Temporary Manual Aperture Control Override (PUSH AUTO IRIS) During manual aperture control mode, press and hold the PUSH AUTO IRIS button. While you keep the button pressed, the camcorder automatically adjusts the aperture to achieve optimal aperture value and exposure. When the shutter speed mode is set to auto (0 66) and the AGC switch is set to ON (0 63) in advance, the shutter speed and gain will be adjusted automatically based on the aperture value. 1 Press and hold the PUSH AUTO IRIS button. • The camcorder automatically sets the exposure. The aperture value, shutter speed and gain values displayed on the screen will change accordingly. 2 Release the PUSH AUTO IRIS button. • The camcorder returns to manual aperture control mode. • The aperture value set by the camcorder will override the previous setting. NOTES • If you press the PUSH AUTO IRIS button and immediately release it, the screen may turn bright and then dark. 70
-
 1
1 -
2
-
3
-
4
-
5
-
6
-
7
-
8
-
9
-
10
-
11
-
12
-
13
-
14
-
15
-
16
-
17
-
18
-
19
-
20
-
21
-
22
-
23
-
24
-
25
-
26
-
27
-
28
-
29
-
30
-
31
-
32
-
33
-
34
-
35
-
36
-
37
-
38
-
39
-
40
-
41
-
42
-
43
-
44
-
45
-
46
-
47
-
48
-
49
-
50
-
51
-
52
-
53
-
54
-
55
-
56
-
57
-
58
-
59
-
60
-
61
-
62
-
63
-
64
-
 65
65 -
 66
66 -
 67
67 -
 68
68 -
 69
69 -
 70
70 -
 71
71 -
 72
72 -
 73
73 -
 74
74 -
 75
75 -
76
-
77
-
78
-
79
-
80
-
81
-
82
-
83
-
84
-
85
-
86
-
87
-
88
-
89
-
90
-
91
-
92
-
93
-
94
-
95
-
96
-
97
-
98
-
99
-
100
-
101
-
102
-
103
-
104
-
105
-
106
-
107
-
108
-
109
-
110
-
111
-
112
-
113
-
114
-
115
-
116
-
117
-
118
-
119
-
120
-
121
-
122
-
123
-
124
-
125
-
126
-
127
-
128
-
129
-
130
-
131
-
132
-
133
-
134
-
135
-
136
-
137
-
138
-
139
-
140
-
141
-
142
-
143
-
144
-
145
-
146
-
147
-
148
-
149
-
150
-
151
-
152
-
153
-
154
-
155
-
156
-
157
-
158
-
159
-
160
-
161
-
162
-
163
-
164
-
165
-
166
-
167
-
168
-
169
-
170
-
171
-
172
-
173
-
174
-
175
-
176
-
177
-
178
-
179
-
180
-
181
-
182
-
183
-
184
-
185
-
186
-
187
-
188
-
189
-
190
-
191
-
192
-
193
-
194
-
195
-
196
-
197
-
198
-
199
-
200
-
201
-
202
-
203
-
204
-
205
-
206
-
207
-
208
 |
 |
