Canon imageFORMULA DR-G2110 User Manual - Page 11
STEP 4 Connecting to a Computer and the Power, Interface Connector Locations, Power Supply Connection
 |
View all Canon imageFORMULA DR-G2110 manuals
Add to My Manuals
Save this manual to your list of manuals |
Page 11 highlights
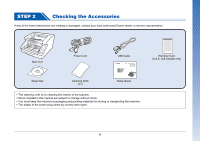
STEP 4 Connecting to a Computer and the Power Connect the scanner to the computer and the power supply. The scanner can be connected to a USB port or LAN port on the computer. IMPORTANT Before connecting the scanner to the computer, verify that the power of the scanner is OFF. If the power is ON, turn it OFF. Interface Connector Locations The USB connector is located on the scanner as shown below. Power Supply Connection 1 Connect the supplied power cord into the power connector on the back of the scanner. (1) 2 Connect the power cord into an AC outlet. (2) Power Connector IMPORTANT Use only the supplied power cord. USB connector LAN Connector 120 V Type 220 - 240 V Type 11
-
 1
1 -
2
-
3
-
4
-
5
-
 6
6 -
 7
7 -
 8
8 -
 9
9 -
 10
10 -
 11
11 -
 12
12 -
 13
13 -
 14
14 -
 15
15 -
 16
16 -
17
-
18
-
19
-
20
-
21
-
22
-
23
-
24
-
25
-
26
-
27
-
28
-
29
-
30
-
31
-
32
-
33
-
34
-
35
-
36
-
37
-
38
-
39
-
40
-
41
-
42
-
43
-
44
-
45
-
46
-
47
-
48
-
49
-
50
-
51
-
52
-
53
-
54
-
55
-
56
-
57
-
58
-
59
-
60
-
61
-
62
-
63
-
64
-
65
-
66
-
67
-
68
-
69
-
70
-
71
-
72
-
73
-
74
-
75
-
76
-
77
-
78
-
79
-
80
-
81
-
82
-
83
-
84
-
85
-
86
-
87
-
88
-
89
-
90
-
91
-
92
-
93
-
94
-
95
-
96
-
97
-
98
-
99
-
100
-
101
-
102
-
103
-
104
-
105
-
106
-
107
-
108
-
109
-
110
-
111
-
112
-
113
-
114
-
115
-
116
-
117
-
118
-
119
-
120
-
121
-
122
-
123
-
124
-
125
-
126
-
127
-
128
-
129
-
130
-
131
-
132
-
133
-
134
-
135
-
136
-
137
-
138
-
139
-
140
-
141
-
142
-
143
-
144
-
145
-
146
-
147
-
148
-
149
-
150
-
151
 |
 |

11
STEP 4
Connecting to a Computer and the Power
Connect the scanner to the computer and the power supply. The
scanner can be connected to a USB port or LAN port on the computer.
IMPORTANT
Before connecting the scanner to the computer, verify that the power
of the scanner is OFF. If the power is ON, turn it OFF.
Interface Connector Locations
The USB connector is located on the scanner as shown below.
IMPORTANT
Use only the supplied power cord.
Power Supply Connection
1
Connect the supplied power cord into the power
connector on the back of the scanner. (1)
2
Connect the power cord into an AC outlet. (2)
USB connector
LAN Connector
Power Connector
120 V Type
220 - 240 V Type