Casio QT 6600 Reference Manual - Page 132
Auto-program operation and CF card utilities, Send / Receive
 |
View all Casio QT 6600 manuals
Add to My Manuals
Save this manual to your list of manuals |
Page 132 highlights
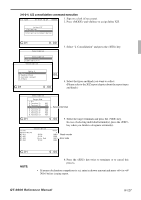
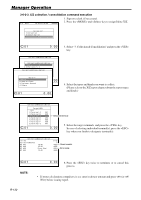
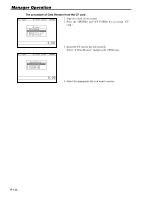
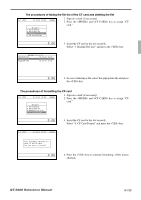
Manager Operation 3-7-2. Auto-program operation and CF card utilities The procedures of auto program function X/Z C01 10-10-01 12:34 000000 AUTO PGM 1.Send 2.Receive 1. Sign on a clerk (if necessary) 2. Press the and key to assign "AUTO PGM." 0.00 3. Select the appropriate menu you want by following the guidance. The hierarchy of the AUTO PGM menus are described below. Auto-program menu hierarchy Send / Receive Copy All Unit Price only Range (Send only) Individual Files All Data All PGM PLU PLU 2nd@ PLU PLU 2nd@ Fixed Totalizer Free Function Sub Department PLU Department Group Character Cashier / Clerk Void Scanning PLU Multi EAN file Batch Maintenance NLU File Non PLU table Scan Mix & Match Table Analysis GT Character General Feature Special Character Report Header Tax Table Pulldown Group Set Menu Table Clerk key ID Batch X / Z Clerk Detail Receipt / SLIP Msg Endorse Message ARG GP1 ARG GP2 ARG GP3 ARG GP4 ARG GP5 Text Recall Check Print Graphic Logo PLU 2nd@ Shift PLU Scheduler Order Char Link Keyboard Character Keyboard System Connection I / O Parameter Printer Connection Hourly/Item Link Mix & match Time Zone Employee Job Code Schedule IDC Link Euro (Sub Currency) Prese Auto Pgm control Screen Color Customer Customer GP Customer Title Menu Title CF X/Z Conv Check Window Clerk Window Sound (1) Sound (2) : Sound (10) Color Definition Color Theme BMP Picture Additional BMP Picture FTP Login Password FTP Server Name FTP Trans File User logo Check Window 21 Check Window 22 Check Window 23 Keys for Check Window Free Function List Tare Table Additional PLU Character Additional Item Program Additional Order Control Sign Off Reason PC Keyboard TCP/IP R-132
-
 1
1 -
2
-
3
-
4
-
5
-
6
-
7
-
8
-
9
-
10
-
11
-
12
-
13
-
14
-
15
-
16
-
17
-
18
-
19
-
20
-
21
-
22
-
23
-
24
-
25
-
26
-
27
-
28
-
29
-
30
-
31
-
32
-
33
-
34
-
35
-
36
-
37
-
38
-
39
-
40
-
41
-
42
-
43
-
44
-
45
-
46
-
47
-
48
-
49
-
50
-
51
-
52
-
53
-
54
-
55
-
56
-
57
-
58
-
59
-
60
-
61
-
62
-
63
-
64
-
65
-
66
-
67
-
68
-
69
-
70
-
71
-
72
-
73
-
74
-
75
-
76
-
77
-
78
-
79
-
80
-
81
-
82
-
83
-
84
-
85
-
86
-
87
-
88
-
89
-
90
-
91
-
92
-
93
-
94
-
95
-
96
-
97
-
98
-
99
-
100
-
101
-
102
-
103
-
104
-
105
-
106
-
107
-
108
-
109
-
110
-
111
-
112
-
113
-
114
-
115
-
116
-
117
-
118
-
119
-
120
-
121
-
122
-
123
-
124
-
125
-
126
-
 127
127 -
 128
128 -
 129
129 -
 130
130 -
 131
131 -
 132
132 -
 133
133 -
 134
134 -
 135
135 -
 136
136 -
 137
137 -
138
-
139
-
140
-
141
-
142
-
143
-
144
-
145
-
146
-
147
-
148
-
149
-
150
-
151
-
152
-
153
-
154
-
155
-
156
-
157
-
158
-
159
-
160
-
161
-
162
-
163
-
164
-
165
-
166
-
167
-
168
-
169
-
170
-
171
-
172
-
173
-
174
-
175
-
176
-
177
-
178
-
179
-
180
-
181
-
182
-
183
-
184
-
185
-
186
-
187
-
188
-
189
-
190
-
191
-
192
-
193
-
194
-
195
-
196
-
197
-
198
-
199
-
200
-
201
-
202
-
203
-
204
-
205
-
206
-
207
-
208
-
209
-
210
-
211
-
212
-
213
-
214
-
215
-
216
-
217
-
218
-
219
-
220
-
221
-
222
-
223
-
224
-
225
-
226
-
227
-
228
-
229
-
230
-
231
-
232
-
233
-
234
-
235
-
236
-
237
-
238
-
239
-
240
 |
 |
