Casio QT 6600 Reference Manual - Page 99
Order ID change
 |
View all Casio QT 6600 manuals
Add to My Manuals
Save this manual to your list of manuals |
Page 99 highlights
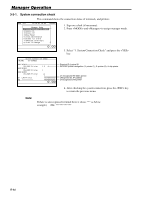
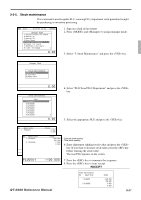
3-3-8. Order ID change This command is used to change the target printer of order temporarily. MGR C01 10-10-01 12:34 000000 Manager Mode 1.System Connection Check 2.Remote On 3.Remote Off 4.Busy Reset 5.Stock Maintenance 6.Drawer for Clerk 7.CHK#(CLK Interrupt) 8.Order ID Change ↓ 0.00 1. Sign on a clerk (if necessary). 2. Press and to assign manager mode. 3. Select "8. Order ID Change" and press the key. Order ID Change Definition Enable 1.Order1 2.Order2 3.Order3 4.Order4 : 15.Order15 16.Order16 OK? YES 0103 0202 0203 0104 0000 0000 YES 0.00 4. Select "YES" of the Definition Enable field, and enter an appropriate ID number of each order printer and press the key. Select "YES" of the last line to execute this command. D4D3D2D1 Note: D4 D3 D2 D1 In case of RS-232C printer, D4D3: Terminal ID number which connects with the printer. D2D1: 01 = Printer 1, 02 = Printer 2, 03 = Printer 3 In case of LAN printer, D D : Terminal ID number which sends data to the printer. 43 D2D1: 11 ~ 26 = Printer 1 ~ 16 QT-6600 Reference Manual R-99
-
 1
1 -
2
-
3
-
4
-
5
-
6
-
7
-
8
-
9
-
10
-
11
-
12
-
13
-
14
-
15
-
16
-
17
-
18
-
19
-
20
-
21
-
22
-
23
-
24
-
25
-
26
-
27
-
28
-
29
-
30
-
31
-
32
-
33
-
34
-
35
-
36
-
37
-
38
-
39
-
40
-
41
-
42
-
43
-
44
-
45
-
46
-
47
-
48
-
49
-
50
-
51
-
52
-
53
-
54
-
55
-
56
-
57
-
58
-
59
-
60
-
61
-
62
-
63
-
64
-
65
-
66
-
67
-
68
-
69
-
70
-
71
-
72
-
73
-
74
-
75
-
76
-
77
-
78
-
79
-
80
-
81
-
82
-
83
-
84
-
85
-
86
-
87
-
88
-
89
-
90
-
91
-
92
-
93
-
 94
94 -
 95
95 -
 96
96 -
 97
97 -
 98
98 -
 99
99 -
 100
100 -
 101
101 -
 102
102 -
 103
103 -
 104
104 -
105
-
106
-
107
-
108
-
109
-
110
-
111
-
112
-
113
-
114
-
115
-
116
-
117
-
118
-
119
-
120
-
121
-
122
-
123
-
124
-
125
-
126
-
127
-
128
-
129
-
130
-
131
-
132
-
133
-
134
-
135
-
136
-
137
-
138
-
139
-
140
-
141
-
142
-
143
-
144
-
145
-
146
-
147
-
148
-
149
-
150
-
151
-
152
-
153
-
154
-
155
-
156
-
157
-
158
-
159
-
160
-
161
-
162
-
163
-
164
-
165
-
166
-
167
-
168
-
169
-
170
-
171
-
172
-
173
-
174
-
175
-
176
-
177
-
178
-
179
-
180
-
181
-
182
-
183
-
184
-
185
-
186
-
187
-
188
-
189
-
190
-
191
-
192
-
193
-
194
-
195
-
196
-
197
-
198
-
199
-
200
-
201
-
202
-
203
-
204
-
205
-
206
-
207
-
208
-
209
-
210
-
211
-
212
-
213
-
214
-
215
-
216
-
217
-
218
-
219
-
220
-
221
-
222
-
223
-
224
-
225
-
226
-
227
-
228
-
229
-
230
-
231
-
232
-
233
-
234
-
235
-
236
-
237
-
238
-
239
-
240
 |
 |
