Casio QT 6600 Reference Manual - Page 138
Registration
 |
View all Casio QT 6600 manuals
Add to My Manuals
Save this manual to your list of manuals |
Page 138 highlights
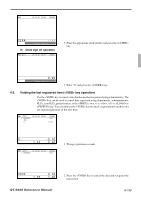
Registration 4. Registrations This section describes characteristic registrations of the QT-6600. Key catch tone, error tone volume can be controlled by the key. 4-1. Clerk sign on / off operation The following examples illustrate the clerk sign on / off operation. • When an i-Button key is used, sign on operation can be performed by attaching the clerk key to the receiver by the appropriate i-Button key. Note: After initialization, i-Button key ID should be set. • When a clerk ID number is programmed for the clerk key, sign on operation can be performed by merely pressing the clerk key on the keyboard or in the clerk pop-up window. It is the same procedure that even clerks are assigned as "clerk", "cashier" or "manager." 1) Clerk sign on operation (Clerk key has the clerk number setting.) REG C01 10-10-01 12:34 000001 Clerk window 1 C01 C02 REG Mode C03 C04 C05 C06 C07 C08 Please sign on. C09 C10 NEXT PREV (clerk pop-up window) 1. Just press the appropriate key in the keyboard or in the clerk pop-up window. 2) Clerk sign on operation (Clerk key has no clerk number setting.) In case of the store has many clerks to control, you need not allocate all clerk keys on the keyboard but allocate a few clerk key and program no clerk number one of the clerk key. REG 10-10-01 12:34 000001 CLK# ---- Please sign on. 1. Press the key, if you want to display no clerk number entries. R-138
-
 1
1 -
2
-
3
-
4
-
5
-
6
-
7
-
8
-
9
-
10
-
11
-
12
-
13
-
14
-
15
-
16
-
17
-
18
-
19
-
20
-
21
-
22
-
23
-
24
-
25
-
26
-
27
-
28
-
29
-
30
-
31
-
32
-
33
-
34
-
35
-
36
-
37
-
38
-
39
-
40
-
41
-
42
-
43
-
44
-
45
-
46
-
47
-
48
-
49
-
50
-
51
-
52
-
53
-
54
-
55
-
56
-
57
-
58
-
59
-
60
-
61
-
62
-
63
-
64
-
65
-
66
-
67
-
68
-
69
-
70
-
71
-
72
-
73
-
74
-
75
-
76
-
77
-
78
-
79
-
80
-
81
-
82
-
83
-
84
-
85
-
86
-
87
-
88
-
89
-
90
-
91
-
92
-
93
-
94
-
95
-
96
-
97
-
98
-
99
-
100
-
101
-
102
-
103
-
104
-
105
-
106
-
107
-
108
-
109
-
110
-
111
-
112
-
113
-
114
-
115
-
116
-
117
-
118
-
119
-
120
-
121
-
122
-
123
-
124
-
125
-
126
-
127
-
128
-
129
-
130
-
131
-
132
-
 133
133 -
 134
134 -
 135
135 -
 136
136 -
 137
137 -
 138
138 -
 139
139 -
 140
140 -
 141
141 -
 142
142 -
 143
143 -
144
-
145
-
146
-
147
-
148
-
149
-
150
-
151
-
152
-
153
-
154
-
155
-
156
-
157
-
158
-
159
-
160
-
161
-
162
-
163
-
164
-
165
-
166
-
167
-
168
-
169
-
170
-
171
-
172
-
173
-
174
-
175
-
176
-
177
-
178
-
179
-
180
-
181
-
182
-
183
-
184
-
185
-
186
-
187
-
188
-
189
-
190
-
191
-
192
-
193
-
194
-
195
-
196
-
197
-
198
-
199
-
200
-
201
-
202
-
203
-
204
-
205
-
206
-
207
-
208
-
209
-
210
-
211
-
212
-
213
-
214
-
215
-
216
-
217
-
218
-
219
-
220
-
221
-
222
-
223
-
224
-
225
-
226
-
227
-
228
-
229
-
230
-
231
-
232
-
233
-
234
-
235
-
236
-
237
-
238
-
239
-
240
 |
 |
