Casio QT 6600 Reference Manual - Page 98
Drawer for clerk, CHK# Clerk interrupt
 |
View all Casio QT 6600 manuals
Add to My Manuals
Save this manual to your list of manuals |
Page 98 highlights
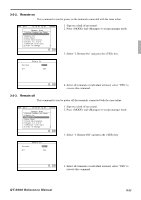
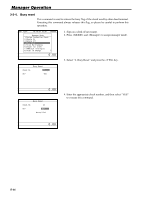
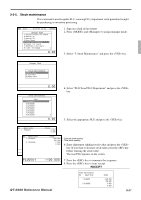
Manager Operation 3-3-6. Drawer for clerk This command is used to designate the drawer 1 ~ 2. MGR C01 10-10-01 12:34 000000 Manager Mode 1.System Connection Check 2.Remote On 3.Remote Off 4.Busy Reset 5.Stock Maintenance 6.Drawer for Clerk 7.CHK#(CLK Interrupt) 8.Order ID Change ↓ 0.00 Drawer for Clerk C01 0 C02 0 C03 0 C04 0 C05 0 C06 0 1. Sign on a clerk (if necessary). 2. Press and to assign manager mode. 3. Select "6. Drawer for Clerk" and press the key. The display shows "Clerk name/Drawer No." list. 4. Select the drawer No. field of the appropriate clerk, enter the drawer number (1 or 2, "0" means drawer 1), and press the key. 5. Press the key to return to the previous menu. 0.00 3-3-7. CHK# (Clerk interrupt) This command is used to designate the check number for clerk interrupt to each clerk. MGR C01 10-10-01 12:34 000000 Manager Mode 1.System Connection Check 2.Remote On 3.Remote Off 4.Busy Reset 5.Stock Maintenance 6.Drawer for Clerk 7.CHK#(CLK Interrupt) 8.Order ID Change ↓ 0.00 C01 C02 C03 C04 C05 C06 CHK#(CLK Interrupt) 011111 022222 033333 044444 055555 066666 1. Sign on a clerk (if necessary). 2. Press and to assign manager mode. 3. Select "7. CHK# (CLK Interrupt)" and press the key. The display shows "Clerk name / Check No." list. 4. Select the check No. field of the appropriate clerk, enter the check number (within 6-digits), and press the key. 5. Press the key to return the previous menu. 0.00 R-98
-
 1
1 -
2
-
3
-
4
-
5
-
6
-
7
-
8
-
9
-
10
-
11
-
12
-
13
-
14
-
15
-
16
-
17
-
18
-
19
-
20
-
21
-
22
-
23
-
24
-
25
-
26
-
27
-
28
-
29
-
30
-
31
-
32
-
33
-
34
-
35
-
36
-
37
-
38
-
39
-
40
-
41
-
42
-
43
-
44
-
45
-
46
-
47
-
48
-
49
-
50
-
51
-
52
-
53
-
54
-
55
-
56
-
57
-
58
-
59
-
60
-
61
-
62
-
63
-
64
-
65
-
66
-
67
-
68
-
69
-
70
-
71
-
72
-
73
-
74
-
75
-
76
-
77
-
78
-
79
-
80
-
81
-
82
-
83
-
84
-
85
-
86
-
87
-
88
-
89
-
90
-
91
-
92
-
 93
93 -
 94
94 -
 95
95 -
 96
96 -
 97
97 -
 98
98 -
 99
99 -
 100
100 -
 101
101 -
 102
102 -
 103
103 -
104
-
105
-
106
-
107
-
108
-
109
-
110
-
111
-
112
-
113
-
114
-
115
-
116
-
117
-
118
-
119
-
120
-
121
-
122
-
123
-
124
-
125
-
126
-
127
-
128
-
129
-
130
-
131
-
132
-
133
-
134
-
135
-
136
-
137
-
138
-
139
-
140
-
141
-
142
-
143
-
144
-
145
-
146
-
147
-
148
-
149
-
150
-
151
-
152
-
153
-
154
-
155
-
156
-
157
-
158
-
159
-
160
-
161
-
162
-
163
-
164
-
165
-
166
-
167
-
168
-
169
-
170
-
171
-
172
-
173
-
174
-
175
-
176
-
177
-
178
-
179
-
180
-
181
-
182
-
183
-
184
-
185
-
186
-
187
-
188
-
189
-
190
-
191
-
192
-
193
-
194
-
195
-
196
-
197
-
198
-
199
-
200
-
201
-
202
-
203
-
204
-
205
-
206
-
207
-
208
-
209
-
210
-
211
-
212
-
213
-
214
-
215
-
216
-
217
-
218
-
219
-
220
-
221
-
222
-
223
-
224
-
225
-
226
-
227
-
228
-
229
-
230
-
231
-
232
-
233
-
234
-
235
-
236
-
237
-
238
-
239
-
240
 |
 |
