Casio QV-R41 Owners Manual - Page 163
Saving an Album, Installing the Software from the CD-ROM, About the bundled CD-ROM
 |
View all Casio QV-R41 manuals
Add to My Manuals
Save this manual to your list of manuals |
Page 163 highlights
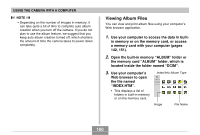
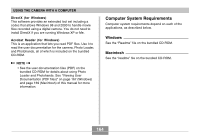
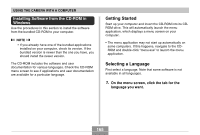
USING THE CAMERA WITH A COMPUTER Saving an Album • To save an album, copy the "DCIM" folder from camera memory or the memory card to your computer's hard disk, a CD-R, an MO disk, or some other storage medium. Note that copying only the "ALBUM" folder, does not copy image data and other necessary files. • After copying the "DCIM" folder, do not change or delete any of the files inside of it. Adding new images or deleting existing images may lead to abnormal album display. • If you plan to use a memory card again after saving its album, first delete all of its files or format it before loading it into the camera. • When you have "WEB" selected for the "Use" setting, the album shows only the smaller image files stored in the "ALBUM" folder. Such images can be uploaded to the Internet more quickly. Installing the Software from the CD-ROM About the bundled CD-ROM The CD-ROM that comes bundled with the camera contains the applications described below. Installation of these applications is optional, and you should install only the ones you want to use. USB Driver for Mass Storage (for Windows) This is the software that makes it possible for the camera to "talk" to your personal computer over a USB connection. If you are using Windows XP, do not install the USB driver from the CD-ROM. With these operating systems, you will be able to perform USB communication simply by connecting the camera to your computer with the USB cable. Photo Loader (for Windows/Macintosh) This application loads image data saved in JPEG and AVI format from a digital camera to your computer. Photohands (for Windows) This application is for retouching and printing image files. 163
-
 1
1 -
2
-
3
-
4
-
5
-
6
-
7
-
8
-
9
-
10
-
11
-
12
-
13
-
14
-
15
-
16
-
17
-
18
-
19
-
20
-
21
-
22
-
23
-
24
-
25
-
26
-
27
-
28
-
29
-
30
-
31
-
32
-
33
-
34
-
35
-
36
-
37
-
38
-
39
-
40
-
41
-
42
-
43
-
44
-
45
-
46
-
47
-
48
-
49
-
50
-
51
-
52
-
53
-
54
-
55
-
56
-
57
-
58
-
59
-
60
-
61
-
62
-
63
-
64
-
65
-
66
-
67
-
68
-
69
-
70
-
71
-
72
-
73
-
74
-
75
-
76
-
77
-
78
-
79
-
80
-
81
-
82
-
83
-
84
-
85
-
86
-
87
-
88
-
89
-
90
-
91
-
92
-
93
-
94
-
95
-
96
-
97
-
98
-
99
-
100
-
101
-
102
-
103
-
104
-
105
-
106
-
107
-
108
-
109
-
110
-
111
-
112
-
113
-
114
-
115
-
116
-
117
-
118
-
119
-
120
-
121
-
122
-
123
-
124
-
125
-
126
-
127
-
128
-
129
-
130
-
131
-
132
-
133
-
134
-
135
-
136
-
137
-
138
-
139
-
140
-
141
-
142
-
143
-
144
-
145
-
146
-
147
-
148
-
149
-
150
-
151
-
152
-
153
-
154
-
155
-
156
-
157
-
 158
158 -
 159
159 -
 160
160 -
 161
161 -
 162
162 -
 163
163 -
 164
164 -
 165
165 -
 166
166 -
 167
167 -
 168
168 -
169
-
170
-
171
-
172
-
173
-
174
-
175
-
176
-
177
-
178
-
179
-
180
-
181
-
182
-
183
-
184
 |
 |