Casio QV-R41 Owners Manual - Page 67
Using Auto Focus, Specifying the Auto Focus Area
 |
View all Casio QV-R41 manuals
Add to My Manuals
Save this manual to your list of manuals |
Page 67 highlights
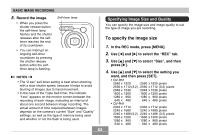
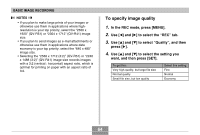
OTHER RECORDING FUNCTIONS Using Auto Focus As its name suggests, Auto Focus focuses the image automatically. The automatic focus operation starts when you press the shutter release button down half way. The following is the Auto Focus range. Range: Approximately 60cm to ∞ (23.6˝ to ∞) 1. Keep pressing [̆] ( ) until there is no focus mode indicator on the display. 2. Compose the image so the main subject is within the focus frame, and then press the shutter release button half way. • You can tell whether the image is focused by observing the focus frame and the green operation lamp. 99 1600 1200 NORMAL IN 1 / 1000 F2.6 03 /12 /24 12 : 58 Focus frame Green operation lamp When you see this: Green focus frame Green operation lamp Red focus frame Flashing green operation lamp It means this: The image is focused. The image is not in focus. 3. Press the shutter release button the rest of the way to record the image. I Specifying the Auto Focus Area You can use the following procedure to change the Auto Focus area used in the Auto Focus Mode and the Macro Mode. Note that the configuration of the focus frame changes in accordance with the Auto Focus area you select. 1. In the REC mode, press [MENU]. 2. On the "REC" tab, select "AF Area", and then press [̈]. 67
-
 1
1 -
2
-
3
-
4
-
5
-
6
-
7
-
8
-
9
-
10
-
11
-
12
-
13
-
14
-
15
-
16
-
17
-
18
-
19
-
20
-
21
-
22
-
23
-
24
-
25
-
26
-
27
-
28
-
29
-
30
-
31
-
32
-
33
-
34
-
35
-
36
-
37
-
38
-
39
-
40
-
41
-
42
-
43
-
44
-
45
-
46
-
47
-
48
-
49
-
50
-
51
-
52
-
53
-
54
-
55
-
56
-
57
-
58
-
59
-
60
-
61
-
 62
62 -
 63
63 -
 64
64 -
 65
65 -
 66
66 -
 67
67 -
 68
68 -
 69
69 -
 70
70 -
 71
71 -
 72
72 -
73
-
74
-
75
-
76
-
77
-
78
-
79
-
80
-
81
-
82
-
83
-
84
-
85
-
86
-
87
-
88
-
89
-
90
-
91
-
92
-
93
-
94
-
95
-
96
-
97
-
98
-
99
-
100
-
101
-
102
-
103
-
104
-
105
-
106
-
107
-
108
-
109
-
110
-
111
-
112
-
113
-
114
-
115
-
116
-
117
-
118
-
119
-
120
-
121
-
122
-
123
-
124
-
125
-
126
-
127
-
128
-
129
-
130
-
131
-
132
-
133
-
134
-
135
-
136
-
137
-
138
-
139
-
140
-
141
-
142
-
143
-
144
-
145
-
146
-
147
-
148
-
149
-
150
-
151
-
152
-
153
-
154
-
155
-
156
-
157
-
158
-
159
-
160
-
161
-
162
-
163
-
164
-
165
-
166
-
167
-
168
-
169
-
170
-
171
-
172
-
173
-
174
-
175
-
176
-
177
-
178
-
179
-
180
-
181
-
182
-
183
-
184
 |
 |
