Casio QV-R41 Owners Manual - Page 73
Adjusting White Balance, to select the setting you, want, and then press [SET]., In the REC mode
 |
View all Casio QV-R41 manuals
Add to My Manuals
Save this manual to your list of manuals |
Page 73 highlights
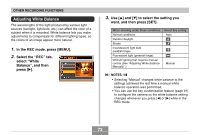
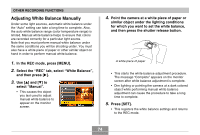
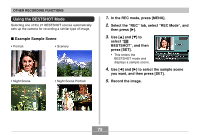
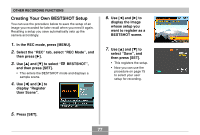
OTHER RECORDING FUNCTIONS Adjusting White Balance The wavelengths of the light produced by various light sources (sunlight, light bulb, etc.) can affect the color of a subject when it is recorded. White balance lets you make adjustments to compensate for different lighting types, so the colors of an image appear more natural. 1. In the REC mode, press [MENU]. 2. Select the "REC" tab, select "White Balance", and then press [̈]. 3. Use [̆] and [̄] to select the setting you want, and then press [SET]. When shooting under these conditions: Normal conditions Outdoor daylight Shade Incandescent light bulb (reddish tinge) Fluorescent light (greenish tinge) Difficult lighting that requires manual control (See "Adjusting White Balance Manually".) Select this setting: Auto Manual NOTES • Selecting "Manual" changes white balance to the settings achieved the last time a manual white balance operation was performed. • You can use the key customization feature (page 91) to configure the camera so the white balance setting changes whenever you press [̇] or [̈] while in the REC mode. 73
-
 1
1 -
2
-
3
-
4
-
5
-
6
-
7
-
8
-
9
-
10
-
11
-
12
-
13
-
14
-
15
-
16
-
17
-
18
-
19
-
20
-
21
-
22
-
23
-
24
-
25
-
26
-
27
-
28
-
29
-
30
-
31
-
32
-
33
-
34
-
35
-
36
-
37
-
38
-
39
-
40
-
41
-
42
-
43
-
44
-
45
-
46
-
47
-
48
-
49
-
50
-
51
-
52
-
53
-
54
-
55
-
56
-
57
-
58
-
59
-
60
-
61
-
62
-
63
-
64
-
65
-
66
-
67
-
 68
68 -
 69
69 -
 70
70 -
 71
71 -
 72
72 -
 73
73 -
 74
74 -
 75
75 -
 76
76 -
 77
77 -
 78
78 -
79
-
80
-
81
-
82
-
83
-
84
-
85
-
86
-
87
-
88
-
89
-
90
-
91
-
92
-
93
-
94
-
95
-
96
-
97
-
98
-
99
-
100
-
101
-
102
-
103
-
104
-
105
-
106
-
107
-
108
-
109
-
110
-
111
-
112
-
113
-
114
-
115
-
116
-
117
-
118
-
119
-
120
-
121
-
122
-
123
-
124
-
125
-
126
-
127
-
128
-
129
-
130
-
131
-
132
-
133
-
134
-
135
-
136
-
137
-
138
-
139
-
140
-
141
-
142
-
143
-
144
-
145
-
146
-
147
-
148
-
149
-
150
-
151
-
152
-
153
-
154
-
155
-
156
-
157
-
158
-
159
-
160
-
161
-
162
-
163
-
164
-
165
-
166
-
167
-
168
-
169
-
170
-
171
-
172
-
173
-
174
-
175
-
176
-
177
-
178
-
179
-
180
-
181
-
182
-
183
-
184
 |
 |
