Celestron CGX-L Equatorial Mount and Tripod CGX-L Manual 5 Languages - Page 8
Polar Align the Mount, Basic Usage
 |
View all Celestron CGX-L Equatorial Mount and Tripod manuals
Add to My Manuals
Save this manual to your list of manuals |
Page 8 highlights
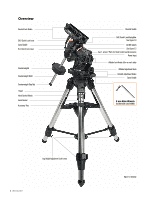
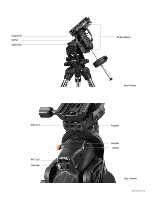
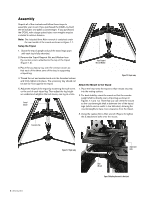
Attach the Hand Control Holster Wrap the hook & loop strap and holster around the tripod leg and place the hand control in the holster. Plug in the Hand Control Plug the supplied NexStar+ hand control into one of the Aux ports. Warning: Do not plug the hand control into the Autoguide Port. Damage to the mount or hand control could occur. Similarly, do not plug an autoguider cable into the Aux port or damage could occur. Home Position The mount is in the "home" position when the counterweight shaft is pointing downward, and the telescope is pointing along the polar axis of the mount as pictured in (Figure 7). The mount's internal switches will take the mount to its home position when you power it on (more on that in "Basic Usage"), but you can still manually position it before powering on the mount. Simply unlock the two lock levers, and move the telescope to the desired position. Polar Align the Mount The computerized go-to is capable of locating objects even if the mount is not perfectly polar aligned. However, polar alignment is necessary to achieve the best tracking accuracy of your mount, and it's essential to astrophotography. When polar aligned, an Equatorial mount tracks the sky in one motion, keeping the object centered in the eyepiece or camera. CGX-L's polar alignment system consists of an altitude adjuster and azimuth adjuster (Figure 8). An optional polar alignment scope is available from Celestron and attaches to the mount. The optional polar axis scope does not pass through the R.A. axis because that area is used for internal cabling. If you are not using the optional polar alignment scope, you can achieve a rough polar alignment by sighting through the viewfinder of your telescope, and adjusting the mount until you center Polaris in the eyepiece of your telescope. This will get you to within about threequarters of a degree within the North Celestial Pole (NCP). Altitude Lock Knobs Altitude Adjustment Knobs Azimuth Adjustment Knobs 8 | ENGLISH Figure 7 Telescope in the home position Figure 8 Polar alignment adjustment Basic Usage With your mount assembled and polar aligned, proceed to startup the mount: Powering the Mount The CGX-L mount can be powered by the supplied car battery adapter to a 12VDC battery source that can deliver at least 3 amperes of current. Or you may use an optional AC adapter that delivers at least 3 amperes of current. AC power adapters with threaded barrel connectors are available from Celestron.
-
 1
1 -
2
-
 3
3 -
 4
4 -
 5
5 -
 6
6 -
 7
7 -
 8
8 -
 9
9 -
 10
10 -
 11
11 -
 12
12 -
 13
13 -
14
-
15
-
16
-
17
-
18
-
19
-
20
-
21
-
22
-
23
-
24
-
25
-
26
-
27
-
28
-
29
-
30
-
31
-
32
-
33
-
34
-
35
-
36
-
37
-
38
-
39
-
40
-
41
-
42
-
43
-
44
-
45
-
46
-
47
-
48
-
49
-
50
-
51
-
52
-
53
-
54
-
55
-
56
-
57
-
58
-
59
-
60
-
61
-
62
-
63
-
64
-
65
-
66
-
67
-
68
-
69
-
70
-
71
-
72
-
73
-
74
-
75
-
76
-
77
-
78
-
79
-
80
-
81
-
82
-
83
-
84
-
85
-
86
-
87
-
88
-
89
-
90
-
91
-
92
-
93
-
94
-
95
-
96
-
97
-
98
-
99
-
100
-
101
-
102
-
103
-
104
-
105
-
106
-
107
-
108
-
109
-
110
-
111
-
112
-
113
-
114
-
115
-
116
-
117
-
118
-
119
-
120
-
121
-
122
-
123
-
124
-
125
-
126
-
127
-
128
-
129
-
130
-
131
-
132
-
133
-
134
-
135
-
136
-
137
-
138
-
139
-
140
 |
 |
