Cisco 7921G Administration Guide - Page 64
Using the Desktop Charger to Charge the Phone, Battery Charging Times Using the Desktop Charger - power supply
 |
UPC - 882658123108
View all Cisco 7921G manuals
Add to My Manuals
Save this manual to your list of manuals |
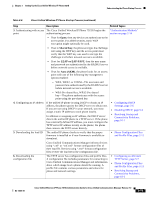
Page 64 highlights
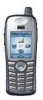
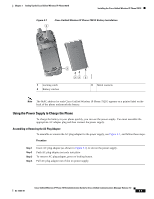
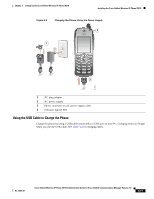
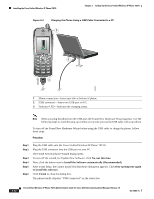
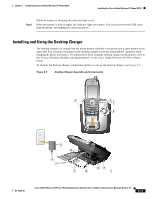
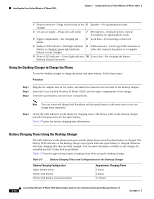
Installing the Cisco Unified Wireless IP Phone 7921G Chapter 3 Setting Up the Cisco Unified Wireless IP Phone 7921G 1 Power connector-Plugs into the back of the 6 Speaker-For speakerphone mode charger 2 AC power supply-Plugs into wall outlet 7 Microphone-Single-direction, internal microphone for speakerphone mode 3 Upper compartment-For charging the phone 8 Lock hole-For inserting a cable lock 4 Battery LED indicator-Red light indicates 9 USB connector-For B-type USB connector on battery is charging; green light indicates cable that connects the phone to a computer battery is fully charged 5 Power LED indicator-Green light indicates 10 Lower slot-For charging the battery desktop charger has power Using the Desktop Charger to Charge the Phone To use the desktop charger to charge the phone and spare battery, follow these steps: Procedure Step 1 Step 2 Step 3 Plug the AC adapter into an AC outlet, and insert the connector into the back of the desktop charger. Insert the Cisco Unified Wireless IP Phone 7921G into the upper compartment of the charger. Insert the spare battery into the lower compartment. Note You can insert and charge both the phone and the spare battery at the same time or you can charge them separately. Step 4 Check the LED indicator on the phone for charging status. The battery LED on the desktop charger provides charging status for the spare battery. Table 3-5 gives the battery charging time information. Battery Charging Times Using the Desktop Charger The LED indicator on the phone turns green and the phone beeps when the phone battery is charged. The battery LED indicator on the desktop charger turns green when the spare battery is charged. Batteries will stop charging after they are fully charged. You can leave the phone or battery in the charger for extended periods of time with no problems. Table 3-5 lists the approximate battery charging times when using the desktop charger. Table 3-5 Battery Charging Times and Configurations for the Desktop Charger Battery Charging Configuration Spare battery alone Phone with battery Phone with battery and spare battery Approximate Charging Times 2 hours 2 hours 2-3 hours 3-14 Cisco Unified Wireless IP Phone 7921G Administration Guide for Cisco Unified Communications Manager Release 7.0 OL-15985-01
-
 1
1 -
2
-
3
-
4
-
5
-
6
-
7
-
8
-
9
-
10
-
11
-
12
-
13
-
14
-
15
-
16
-
17
-
18
-
19
-
20
-
21
-
22
-
23
-
24
-
25
-
26
-
27
-
28
-
29
-
30
-
31
-
32
-
33
-
34
-
35
-
36
-
37
-
38
-
39
-
40
-
41
-
42
-
43
-
44
-
45
-
46
-
47
-
48
-
49
-
50
-
51
-
52
-
53
-
54
-
55
-
56
-
57
-
58
-
 59
59 -
 60
60 -
 61
61 -
 62
62 -
 63
63 -
 64
64 -
 65
65 -
 66
66 -
 67
67 -
 68
68 -
 69
69 -
70
-
71
-
72
-
73
-
74
-
75
-
76
-
77
-
78
-
79
-
80
-
81
-
82
-
83
-
84
-
85
-
86
-
87
-
88
-
89
-
90
-
91
-
92
-
93
-
94
-
95
-
96
-
97
-
98
-
99
-
100
-
101
-
102
-
103
-
104
-
105
-
106
-
107
-
108
-
109
-
110
-
111
-
112
-
113
-
114
-
115
-
116
-
117
-
118
-
119
-
120
-
121
-
122
-
123
-
124
-
125
-
126
-
127
-
128
-
129
-
130
-
131
-
132
-
133
-
134
-
135
-
136
-
137
-
138
-
139
-
140
-
141
-
142
-
143
-
144
-
145
-
146
-
147
-
148
-
149
-
150
-
151
-
152
-
153
-
154
-
155
-
156
-
157
-
158
-
159
-
160
-
161
-
162
-
163
-
164
-
165
-
166
-
167
-
168
-
169
-
170
-
171
-
172
-
173
-
174
-
175
-
176
-
177
-
178
-
179
-
180
-
181
-
182
-
183
-
184
-
185
-
186
-
187
-
188
-
189
-
190
-
191
-
192
-
193
-
194
-
195
-
196
-
197
-
198
-
199
-
200
-
201
-
202
-
203
-
204
-
205
-
206
-
207
-
208
-
209
-
210
-
211
-
212
-
213
-
214
-
215
-
216
-
217
-
218
-
219
-
220
-
221
-
222
-
223
-
224
-
225
-
226
-
227
-
228
-
229
-
230
-
231
-
232
-
233
-
234
 |
 |