Cisco AP541N-A-K9 Administration Guide - Page 11
Connecting the Access Point to a PC, Administration PC IP Address - ap
 |
View all Cisco AP541N-A-K9 manuals
Add to My Manuals
Save this manual to your list of manuals |
Page 11 highlights
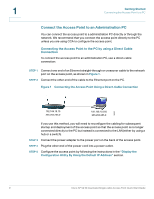
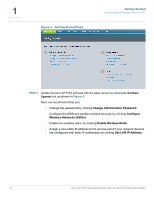
Getting Started Connecting the Access Point to a PC 1 Administration PC IP Address We recommend that if you are starting from the default configuration or this is the first time the device will be configured that you configure the device before you deploy it in the network by using the access point default static IP address (192.168.10.10). To do so, the PC IP address must be on the same subnet as the access point. Verify that your PC IP address is set to an address on the same subnet as the access point: STEP 1 From the Windows Start menu, choose Settings > Control Panel. STEP 2 On the Control Panel dialog box, click Network. STEP 3 In the Network dialog box select TCP/IP for your PC Ethernet card, then click Properties. STEP 4 In the IP Address window, click Specify an IP address. STEP 5 In the IP Address field, enter an IP address that is in the same subnet as the access point IP address. (The default access point IP address is 192.168.10.10. The default subnet mask is 255.255.255.0.) For example, you can set the: PC IP address to 192.168.10.250 PC IP subnet mask to 255.255.255.0 STEP 6 In the Subnet Mask field, type 255.255.255.0. STEP 7 Click OK. STEP 8 If you are prompted to restart your PC, click Yes. Connecting the Access Point to a PC To configure the access point, you can connect the access point directly to an administration PC or through the network to an administration PC. If you are not using CCA to configure the access point, we recommend that you configure the device before deploying it in the network by following the instructions in the "Connect the Access Point to an Administration PC" section. Otherwise, follow the instructions in the "Connecting the Access Point to the PC through a Network Connection" Cisco AP 541N Dual-band Single-radio Access Point Quick Start Guide 8
-
 1
1 -
2
-
3
-
4
-
5
-
 6
6 -
 7
7 -
 8
8 -
 9
9 -
 10
10 -
 11
11 -
 12
12 -
 13
13 -
 14
14 -
 15
15 -
 16
16 -
17
-
18
-
19
-
20
-
21
-
22
-
23
-
24
-
25
-
26
-
27
-
28
-
29
-
30
-
31
-
32
-
33
-
34
-
35
-
36
-
37
-
38
-
39
-
40
-
41
-
42
-
43
-
44
-
45
-
46
-
47
-
48
-
49
-
50
-
51
-
52
-
53
-
54
-
55
-
56
-
57
-
58
-
59
-
60
-
61
-
62
-
63
-
64
-
65
-
66
-
67
-
68
-
69
-
70
-
71
-
72
-
73
-
74
-
75
-
76
-
77
-
78
-
79
-
80
-
81
-
82
-
83
-
84
-
85
-
86
-
87
-
88
-
89
-
90
-
91
-
92
-
93
-
94
-
95
-
96
-
97
-
98
-
99
-
100
-
101
-
102
-
103
-
104
-
105
-
106
-
107
-
108
-
109
-
110
-
111
-
112
-
113
-
114
-
115
-
116
-
117
-
118
-
119
-
120
-
121
-
122
-
123
-
124
-
125
-
126
-
127
-
128
-
129
-
130
-
131
-
132
-
133
-
134
-
135
-
136
-
137
-
138
-
139
-
140
-
141
-
142
-
143
-
144
-
145
-
146
-
147
-
148
-
149
-
150
-
151
-
152
-
153
-
154
-
155
-
156
-
157
-
158
-
159
-
160
-
161
-
162
-
163
-
164
-
165
-
166
-
167
-
168
-
169
-
170
-
171
-
172
-
173
-
174
-
175
-
176
 |
 |