Cisco AP541N-A-K9 Administration Guide - Page 14
Launching the Access Point Configuration Utility - dhcp
 |
View all Cisco AP541N-A-K9 manuals
Add to My Manuals
Save this manual to your list of manuals |
Page 14 highlights
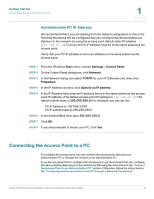
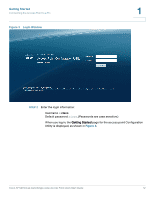
1 Getting Started Connecting the Access Point to a PC Launching the Access Point Configuration Utility This section contains information for the for launching the Access Point Configuration Utility: • Using the default static IP address of the switch. Follow the instructions in the "Display the Configuration Utility By Using the Default IP Address" section. • Using Cisco Configuration Assistant (CCA). Follow the instructions in the "Display the Configuration Utility by Using Cisco Configuration Assistant 2.1 or higher" section. • Using the an IP address assigned to the switch through DHCP. Follow the instructions in the "Display the Configuration Utility by Using Another IP Address" section. Display the Configuration Utility By Using the Default IP Address To access the Access Point Configuration Utility, enter the default static IP address of the access point into a Web browser, do the following: STEP 1 Enter the Cisco AP 541N default static IP address in the address bar and press Enter. For example, http://192.168.10.10. The Login window displays, as shown in Figure 3. 11 Cisco AP 541N Dual-band Single-radio Access Point Quick Start Guide
-
 1
1 -
2
-
3
-
4
-
5
-
6
-
7
-
8
-
 9
9 -
 10
10 -
 11
11 -
 12
12 -
 13
13 -
 14
14 -
 15
15 -
 16
16 -
 17
17 -
 18
18 -
 19
19 -
20
-
21
-
22
-
23
-
24
-
25
-
26
-
27
-
28
-
29
-
30
-
31
-
32
-
33
-
34
-
35
-
36
-
37
-
38
-
39
-
40
-
41
-
42
-
43
-
44
-
45
-
46
-
47
-
48
-
49
-
50
-
51
-
52
-
53
-
54
-
55
-
56
-
57
-
58
-
59
-
60
-
61
-
62
-
63
-
64
-
65
-
66
-
67
-
68
-
69
-
70
-
71
-
72
-
73
-
74
-
75
-
76
-
77
-
78
-
79
-
80
-
81
-
82
-
83
-
84
-
85
-
86
-
87
-
88
-
89
-
90
-
91
-
92
-
93
-
94
-
95
-
96
-
97
-
98
-
99
-
100
-
101
-
102
-
103
-
104
-
105
-
106
-
107
-
108
-
109
-
110
-
111
-
112
-
113
-
114
-
115
-
116
-
117
-
118
-
119
-
120
-
121
-
122
-
123
-
124
-
125
-
126
-
127
-
128
-
129
-
130
-
131
-
132
-
133
-
134
-
135
-
136
-
137
-
138
-
139
-
140
-
141
-
142
-
143
-
144
-
145
-
146
-
147
-
148
-
149
-
150
-
151
-
152
-
153
-
154
-
155
-
156
-
157
-
158
-
159
-
160
-
161
-
162
-
163
-
164
-
165
-
166
-
167
-
168
-
169
-
170
-
171
-
172
-
173
-
174
-
175
-
176
 |
 |
