Cisco AP541N-A-K9 Administration Guide - Page 12
Connect the Access Point to an Administration PC - configuration
 |
View all Cisco AP541N-A-K9 manuals
Add to My Manuals
Save this manual to your list of manuals |
Page 12 highlights
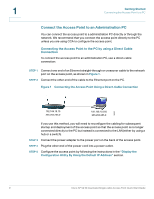
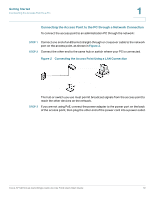
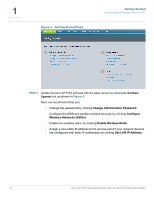
1 Getting Started Connecting the Access Point to a PC Connect the Access Point to an Administration PC You can connect the access point to a administration PC directly or through the network. We recommend that you connect the access point directly to the PC unless you are using CCA to configure the access point. Connecting the Access Point to the PC by using a Direct Cable Connection To connect the access point to an administration PC, use a direct-cable connection: STEP 1 Connect one end of an Ethernet straight-through or crossover cable to the network port on the access point, as shown in Figure 1. STEP 2 Connect the other end of the cable to the Ethernet port on the PC. Figure 1 Connecting the Access Point Using a Direct-Cable Connection 195057 192.168.10.10 255.255.255.0 192.168.10.250 255.255.255.0 If you use this method, you will need to reconfigure the cabling for subsequent startup and deployment of the access point so that the access point is no longer connected directly to the PC but instead is connected to the LAN (either by using a hub or a switch). STEP 3 Connect the power adapter to the power port on the back of the access point. STEP 4 Plug the other end of the power cord into a power outlet. STEP 5 Configure the access point by following the instructions in the "Display the Configuration Utility By Using the Default IP Address" section. 9 Cisco AP 541N Dual-band Single-radio Access Point Quick Start Guide
-
 1
1 -
2
-
3
-
4
-
5
-
6
-
 7
7 -
 8
8 -
 9
9 -
 10
10 -
 11
11 -
 12
12 -
 13
13 -
 14
14 -
 15
15 -
 16
16 -
 17
17 -
18
-
19
-
20
-
21
-
22
-
23
-
24
-
25
-
26
-
27
-
28
-
29
-
30
-
31
-
32
-
33
-
34
-
35
-
36
-
37
-
38
-
39
-
40
-
41
-
42
-
43
-
44
-
45
-
46
-
47
-
48
-
49
-
50
-
51
-
52
-
53
-
54
-
55
-
56
-
57
-
58
-
59
-
60
-
61
-
62
-
63
-
64
-
65
-
66
-
67
-
68
-
69
-
70
-
71
-
72
-
73
-
74
-
75
-
76
-
77
-
78
-
79
-
80
-
81
-
82
-
83
-
84
-
85
-
86
-
87
-
88
-
89
-
90
-
91
-
92
-
93
-
94
-
95
-
96
-
97
-
98
-
99
-
100
-
101
-
102
-
103
-
104
-
105
-
106
-
107
-
108
-
109
-
110
-
111
-
112
-
113
-
114
-
115
-
116
-
117
-
118
-
119
-
120
-
121
-
122
-
123
-
124
-
125
-
126
-
127
-
128
-
129
-
130
-
131
-
132
-
133
-
134
-
135
-
136
-
137
-
138
-
139
-
140
-
141
-
142
-
143
-
144
-
145
-
146
-
147
-
148
-
149
-
150
-
151
-
152
-
153
-
154
-
155
-
156
-
157
-
158
-
159
-
160
-
161
-
162
-
163
-
164
-
165
-
166
-
167
-
168
-
169
-
170
-
171
-
172
-
173
-
174
-
175
-
176
 |
 |
