Cisco CISCO1401 Software Guide - Page 67
Displaying the TACACS+ Configuration
 |
UPC - 746320202785
View all Cisco CISCO1401 manuals
Add to My Manuals
Save this manual to your list of manuals |
Page 67 highlights
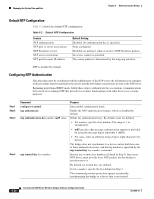
Chapter 5 Administering the Bridge Configuring the Bridge for Local Authentication and Authorization • Use TACACS+ for privileged EXEC access authorization if authentication was performed by using TACACS+. • Use the local database if authentication was not performed by using TACACS+. Note Authorization is bypassed for authenticated users who log in through the CLI even if authorization has been configured. Beginning in privileged EXEC mode, follow these steps to specify TACACS+ authorization for privileged EXEC access and network services: Step 1 Step 2 Command configure terminal aaa authorization network tacacs+ Step 3 aaa authorization exec tacacs+ Step 4 Step 5 Step 6 end show running-config copy running-config startup-config Purpose Enter global configuration mode. Configure the bridge for user TACACS+ authorization for all network-related service requests. Configure the bridge for user TACACS+ authorization to determine if the user has privileged EXEC access. The exec keyword might return user profile information (such as autocommand information). Return to privileged EXEC mode. Verify your entries. (Optional) Save your entries in the configuration file. To disable authorization, use the no aaa authorization {network | exec} method1 global configuration command. Displaying the TACACS+ Configuration To display TACACS+ server statistics, use the show tacacs privileged EXEC command. Configuring the Bridge for Local Authentication and Authorization You can configure AAA to operate without a server by setting the bridge to implement AAA in local mode. The bridge then handles authentication and authorization. No accounting is available in this configuration. Beginning in privileged EXEC mode, follow these steps to configure the bridge for local AAA: Step 1 Step 2 Command configure terminal aaa new-model Purpose Enter global configuration mode. Enable AAA. OL-4059-01 Cisco Aironet 1400 Series Wireless Bridges Software Configuration Guide 5-15
-
 1
1 -
2
-
3
-
4
-
5
-
6
-
7
-
8
-
9
-
10
-
11
-
12
-
13
-
14
-
15
-
16
-
17
-
18
-
19
-
20
-
21
-
22
-
23
-
24
-
25
-
26
-
27
-
28
-
29
-
30
-
31
-
32
-
33
-
34
-
35
-
36
-
37
-
38
-
39
-
40
-
41
-
42
-
43
-
44
-
45
-
46
-
47
-
48
-
49
-
50
-
51
-
52
-
53
-
54
-
55
-
56
-
57
-
58
-
59
-
60
-
61
-
 62
62 -
 63
63 -
 64
64 -
 65
65 -
 66
66 -
 67
67 -
 68
68 -
 69
69 -
 70
70 -
 71
71 -
 72
72 -
73
-
74
-
75
-
76
-
77
-
78
-
79
-
80
-
81
-
82
-
83
-
84
-
85
-
86
-
87
-
88
-
89
-
90
-
91
-
92
-
93
-
94
-
95
-
96
-
97
-
98
-
99
-
100
-
101
-
102
-
103
-
104
-
105
-
106
-
107
-
108
-
109
-
110
-
111
-
112
-
113
-
114
-
115
-
116
-
117
-
118
-
119
-
120
-
121
-
122
-
123
-
124
-
125
-
126
-
127
-
128
-
129
-
130
-
131
-
132
-
133
-
134
-
135
-
136
-
137
-
138
-
139
-
140
-
141
-
142
-
143
-
144
-
145
-
146
-
147
-
148
-
149
-
150
-
151
-
152
-
153
-
154
-
155
-
156
-
157
-
158
-
159
-
160
-
161
-
162
-
163
-
164
-
165
-
166
-
167
-
168
-
169
-
170
-
171
-
172
-
173
-
174
-
175
-
176
-
177
-
178
-
179
-
180
-
181
-
182
-
183
-
184
-
185
-
186
-
187
-
188
-
189
-
190
-
191
-
192
-
193
-
194
-
195
-
196
-
197
-
198
-
199
-
200
-
201
-
202
-
203
-
204
-
205
-
206
-
207
-
208
-
209
-
210
-
211
-
212
-
213
-
214
-
215
-
216
-
217
-
218
-
219
-
220
-
221
-
222
-
223
-
224
-
225
-
226
-
227
-
228
-
229
-
230
-
231
-
232
-
233
-
234
-
235
-
236
-
237
-
238
-
239
-
240
-
241
-
242
-
243
-
244
-
245
-
246
-
247
-
248
-
249
-
250
-
251
-
252
-
253
-
254
-
255
-
256
-
257
-
258
-
259
-
260
-
261
-
262
-
263
-
264
-
265
-
266
-
267
-
268
-
269
-
270
-
271
-
272
-
273
-
274
-
275
-
276
-
277
-
278
-
279
-
280
-
281
-
282
-
283
-
284
-
285
-
286
 |
 |
