Cisco CISCO1401 Software Guide - Page 73
Configuring NTP Associations, con terminal
 |
UPC - 746320202785
View all Cisco CISCO1401 manuals
Add to My Manuals
Save this manual to your list of manuals |
Page 73 highlights
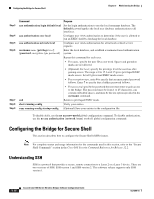
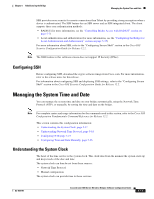
Chapter 5 Administering the Bridge Managing the System Time and Date Step 5 Step 6 Step 7 Command end show running-config copy running-config startup-config Purpose Return to privileged EXEC mode. Verify your entries. (Optional) Save your entries in the configuration file. To disable NTP authentication, use the no ntp authenticate global configuration command. To remove an authentication key, use the no ntp authentication-key number global configuration command. To disable authentication of the identity of a device, use the no ntp trusted-key key-number global configuration command. This example shows how to configure the bridge to synchronize only to devices providing authentication key 42 in the device's NTP packets: bridge(config)# ntp authenticate bridge(config)# ntp authentication-key 42 md5 aNiceKey bridge(config)# ntp trusted-key 42 Configuring NTP Associations An NTP association can be a peer association (this bridge can either synchronize to the other device or allow the other device to synchronize to it), or it can be a server association (meaning that only this bridge synchronizes to the other device, and not the other way around). Beginning in privileged EXEC mode, follow these steps to form an NTP association with another device: Step 1 Step 2 Command Purpose configure terminal Enter global configuration mode. ntp peer ip-address [version number] Configure the bridge system clock to synchronize a peer or to be [key keyid] [source interface] [prefer] synchronized by a peer (peer association). or or ntp server ip-address [version number] Configure the bridge system clock to be synchronized by a time server [key keyid] [source interface] [prefer] (server association). No peer or server associations are defined by default. • For ip-address in a peer association, specify either the IP address of the peer providing, or being provided, the clock synchronization. For a server association, specify the IP address of the time server providing the clock synchronization. • (Optional) For number, specify the NTP version number. The range is 1 to 3. By default, version 3 is selected. • (Optional) For keyid, enter the authentication key defined with the ntp authentication-key global configuration command. • (Optional) For interface, specify the interface from which to pick the IP source address. By default, the source IP address is taken from the outgoing interface. • (Optional) Enter the prefer keyword to make this peer or server the preferred one that provides synchronization. This keyword reduces switching back and forth between peers and servers. OL-4059-01 Cisco Aironet 1400 Series Wireless Bridges Software Configuration Guide 5-21
-
 1
1 -
2
-
3
-
4
-
5
-
6
-
7
-
8
-
9
-
10
-
11
-
12
-
13
-
14
-
15
-
16
-
17
-
18
-
19
-
20
-
21
-
22
-
23
-
24
-
25
-
26
-
27
-
28
-
29
-
30
-
31
-
32
-
33
-
34
-
35
-
36
-
37
-
38
-
39
-
40
-
41
-
42
-
43
-
44
-
45
-
46
-
47
-
48
-
49
-
50
-
51
-
52
-
53
-
54
-
55
-
56
-
57
-
58
-
59
-
60
-
61
-
62
-
63
-
64
-
65
-
66
-
67
-
 68
68 -
 69
69 -
 70
70 -
 71
71 -
 72
72 -
 73
73 -
 74
74 -
 75
75 -
 76
76 -
 77
77 -
 78
78 -
79
-
80
-
81
-
82
-
83
-
84
-
85
-
86
-
87
-
88
-
89
-
90
-
91
-
92
-
93
-
94
-
95
-
96
-
97
-
98
-
99
-
100
-
101
-
102
-
103
-
104
-
105
-
106
-
107
-
108
-
109
-
110
-
111
-
112
-
113
-
114
-
115
-
116
-
117
-
118
-
119
-
120
-
121
-
122
-
123
-
124
-
125
-
126
-
127
-
128
-
129
-
130
-
131
-
132
-
133
-
134
-
135
-
136
-
137
-
138
-
139
-
140
-
141
-
142
-
143
-
144
-
145
-
146
-
147
-
148
-
149
-
150
-
151
-
152
-
153
-
154
-
155
-
156
-
157
-
158
-
159
-
160
-
161
-
162
-
163
-
164
-
165
-
166
-
167
-
168
-
169
-
170
-
171
-
172
-
173
-
174
-
175
-
176
-
177
-
178
-
179
-
180
-
181
-
182
-
183
-
184
-
185
-
186
-
187
-
188
-
189
-
190
-
191
-
192
-
193
-
194
-
195
-
196
-
197
-
198
-
199
-
200
-
201
-
202
-
203
-
204
-
205
-
206
-
207
-
208
-
209
-
210
-
211
-
212
-
213
-
214
-
215
-
216
-
217
-
218
-
219
-
220
-
221
-
222
-
223
-
224
-
225
-
226
-
227
-
228
-
229
-
230
-
231
-
232
-
233
-
234
-
235
-
236
-
237
-
238
-
239
-
240
-
241
-
242
-
243
-
244
-
245
-
246
-
247
-
248
-
249
-
250
-
251
-
252
-
253
-
254
-
255
-
256
-
257
-
258
-
259
-
260
-
261
-
262
-
263
-
264
-
265
-
266
-
267
-
268
-
269
-
270
-
271
-
272
-
273
-
274
-
275
-
276
-
277
-
278
-
279
-
280
-
281
-
282
-
283
-
284
-
285
-
286
 |
 |
