Cisco CISCO776 Installation Guide - Page 87
Terminal Communications, Establishing a Terminal Connection
 |
View all Cisco CISCO776 manuals
Add to My Manuals
Save this manual to your list of manuals |
Page 87 highlights
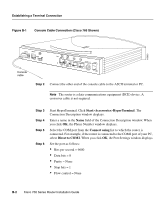
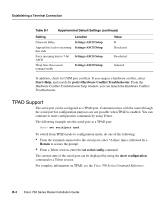
APPENDIX B Terminal Communications This appendix describes the processes for establishing a terminal connection, loading the Cisco 700 IOS software (also known as the software image), and loading and saving the current configuration. Establishing a Terminal Connection By connecting an ASCII terminal or PC running terminal emulation software, you can configure the router through a serial connection. This might not be necessary for the following reasons: • You are configuring the router through the LAN by using Cisco 700 Fast Step Setup or Telnet. • The router is preconfigured by a vendor or network administrator to be "plug-and-play." • The router will be configured using Trivial File Transfer Protocol (TFTP) and can "discover" its configuration. The example in this section shows how to connect to the router serial communications port from your ASCII terminal or PC by using Hyperterminal. (Hyperterminal is an accessory software application included with the Windows operating system.) Take the following steps to connect your router to a console through the configuration port: Step 1 Connect the blue DB-9-to-DB-9 serial cable from your terminal to the rear-panel port labeled CONFIG. (See Figure B-1.) If your terminal or PC console has a DB-25 connector, use the included DB-25-to-DB-9 adapter. If you are connecting the router to a Macintosh computer, you need a straight-through RS-422-to-DB-9 or RS-422-to-DB-25 cable. Terminal Communications B-1
-
 1
1 -
2
-
3
-
4
-
5
-
6
-
7
-
8
-
9
-
10
-
11
-
12
-
13
-
14
-
15
-
16
-
17
-
18
-
19
-
20
-
21
-
22
-
23
-
24
-
25
-
26
-
27
-
28
-
29
-
30
-
31
-
32
-
33
-
34
-
35
-
36
-
37
-
38
-
39
-
40
-
41
-
42
-
43
-
44
-
45
-
46
-
47
-
48
-
49
-
50
-
51
-
52
-
53
-
54
-
55
-
56
-
57
-
58
-
59
-
60
-
61
-
62
-
63
-
64
-
65
-
66
-
67
-
68
-
69
-
70
-
71
-
72
-
73
-
74
-
75
-
76
-
77
-
78
-
79
-
80
-
81
-
 82
82 -
 83
83 -
 84
84 -
 85
85 -
 86
86 -
 87
87 -
 88
88 -
 89
89 -
 90
90 -
 91
91 -
 92
92 -
93
-
94
-
95
-
96
-
97
-
98
-
99
-
100
-
101
-
102
-
103
-
104
-
105
-
106
-
107
-
108
-
109
-
110
-
111
-
112
-
113
-
114
-
115
-
116
-
117
-
118
 |
 |
