Cisco SRW2008P User Guide - Page 11
Installation - power supply
 |
UPC - 745883571024
View all Cisco SRW2008P manuals
Add to My Manuals
Save this manual to your list of manuals |
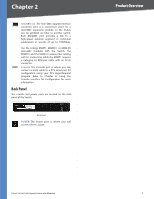
Page 11 highlights
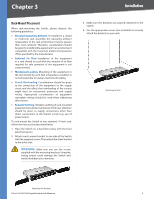
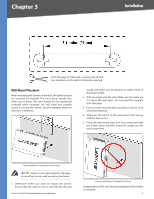
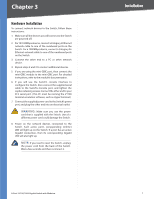
Chapter 3 Installation Rack-Mount Placement When rack-mounting the Switch, please observe the following guidelines: •• Elevated Operating Ambient If installed in a closed or multi-unit rack assembly, the operating ambient temperature of the rack environment may be greater than room ambient. Therefore, consideration should be given to installing the equipment in an environment compatible with the maximum ambient temperature (Tma) specified by the manufacturer. •• Reduced Air Flow Installation of the equipment in a rack should be such that the amount of air flow required for safe operation of the equipment is not compromised. •• Mechanical Loading Mounting of the equipment in the rack should be such that a hazardous condition is not achieved due to uneven mechanical loading. •• Circuit Overloading Consideration should be given to the connection of the equipment to the supply circuit and the effect that overloading of the circuits might have on overcurrent protection and supply wiring. Appropriate consideration of equipment nameplate ratings should be used when addressing this concern. •• Reliable Earthing Reliable earthing of rack-mounted equipment should be maintained. Particular attention should be given to supply connections other than direct connections to the branch circuit (e.g. use of power strips). To rack-mount the Switch in any standard 19-inch rack, follow the instructions described below. 1. Place the Switch on a hard flat surface with the front panel facing you. 2. Attach a rack-mount bracket to one side of the Switch with the supplied screws. Then attach the other bracket to the other side. WARNING: Make sure you use the screws supplied with the mounting brackets. Using the wrong screws could damage the Switch and would invalidate your warranty. 3. Make sure the brackets are properly attached to the Switch. 4. Use the appropriate screws (not included) to securely attach the brackets to your rack. Mounting in Rack Attaching the Brackets 8-Port 10/100/1000 Gigabit Switch with Webview 5
-
 1
1 -
2
-
3
-
4
-
5
-
 6
6 -
 7
7 -
 8
8 -
 9
9 -
 10
10 -
 11
11 -
 12
12 -
 13
13 -
 14
14 -
 15
15 -
 16
16 -
17
-
18
-
19
-
20
-
21
-
22
-
23
-
24
-
25
-
26
-
27
-
28
-
29
-
30
-
31
-
32
-
33
-
34
-
35
-
36
-
37
-
38
-
39
-
40
-
41
-
42
-
43
-
44
-
45
-
46
-
47
-
48
-
49
-
50
-
51
-
52
-
53
-
54
-
55
-
56
-
57
-
58
-
59
-
60
-
61
-
62
-
63
-
64
-
65
-
66
-
67
-
68
-
69
-
70
-
71
-
72
-
73
-
74
-
75
-
76
-
77
-
78
-
79
-
80
-
81
 |
 |
