Cub Cadet ZT1 42 FAB Operation Manual - Page 30
Tractor Blade Care, Changing the Transmission Drive Belt, Tractor Creeping
 |
View all Cub Cadet ZT1 42 FAB manuals
Add to My Manuals
Save this manual to your list of manuals |
Page 30 highlights
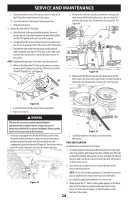
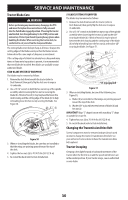
SERVICE AND MAINTENANCE Tractor Blade Care WARNING Before performing any maintenance, disengage the PTO and move the lapbar drive control levers fully outward into the Park Brake engaged position. If leaving the tractor unattended, turn the ignition key to the STOP position and remove key. Protect your hands by using heavy gloves when handling the blades. When servicing the tractor deck, be careful not to cut yourself on the sharpened blades. The cutting blades must be kept sharp at all times. Sharpen the cutting edges of the blades evenly so that the blades remain balanced and the same angle of sharpness is maintained. If the cutting edge of a blade has already been sharpened many times or if any metal separation is present, it is recommended that new blades be installed. New blades are available at your authorized dealer. STAR-BLADE SYSTEM (IF EQUIPPED) The blades may be removed as follows: 1. Remove the deck from beneath the tractor (refer to Deck Removal) then gently flip the deck over to expose its underside. 2. Use a 15⁄16" wrench to hold the hex nut on top of the spindle assembly when loosening the hex nut (a) securing the blade (b). A block of wood (c) may be placed between the deck housing and the cutting edge of the blade (b) to help in breaking loose the hex nut (a) securing the blade. See Figure 50. (c) (a) (b) Figure 50 3. When re-installing the blades, be sure they are installed so that the wings are pointing upward toward the top of the deck. 4. Tighten the hex nuts (a) to 70-90 ft-lbs (95-122 N-m). 5. Re-install the deck (refer to Deck Installation). S-BLADE SYSTEM (IF EQUIPPED) The blades may be removed as follows: 1. Remove the deck from beneath the tractor (refer to Deck Removal) then gently flip the deck over to expose its underside. 2. Use a 15⁄16" wrench to hold the hex nut on top of the spindle assembly when loosening the hex nut (a) and washer (d)* securing the blade (b). A block of wood (c) may be placed between the deck housing and the cutting edge of the blade (b) to help in breaking loose the hex nut (a) and washer (d)* securing the blade. See Figure 51. (a) (c) (d)* (b) * If equipped Figure 51 3. When re-installing blades, be sure of the following (see Figure 51): a. Blades (b) are installed so that wings are pointing upward toward the top of the deck. b. Washer (d)* is placed between bottom of blade (b) and hex nut (a). IMPORTANT! Align "S" shaped cutout with matching "S" shape on spindle for secure fit. 4. Tighten hex nuts (a) to 70-90 ft-lbs (95-122 N-m). 5. Re-install the deck (refer to Deck Installation). Changing the Transmission Drive Belt Several components must be removed and special tools used in order to change the tractor's transmission drive belt. See your authorized service dealer to have the transmission drive belt replaced. Tractor Creeping Creeping is the slight forward or backward movement of the tractor when the throttle is on and the speed control levers are in the neutral position. If your tractor creeps, see an authorized service dealer. 30
-
 1
1 -
2
-
3
-
4
-
5
-
6
-
7
-
8
-
9
-
10
-
11
-
12
-
13
-
14
-
15
-
16
-
17
-
18
-
19
-
20
-
21
-
22
-
23
-
24
-
 25
25 -
 26
26 -
 27
27 -
 28
28 -
 29
29 -
 30
30 -
 31
31 -
 32
32 -
 33
33 -
 34
34 -
 35
35 -
36
-
37
-
38
-
39
-
40
-
41
-
42
-
43
-
44
-
45
-
46
-
47
-
48
-
49
-
50
-
51
-
52
-
53
-
54
-
55
-
56
-
57
-
58
-
59
-
60
-
61
-
62
-
63
-
64
-
65
-
66
-
67
-
68
-
69
-
70
-
71
-
72
-
73
-
74
-
75
-
76
-
77
-
78
-
79
-
80
-
81
-
82
-
83
-
84
-
85
-
86
-
87
-
88
-
89
-
90
-
91
-
92
-
93
-
94
-
95
-
96
-
97
-
98
-
99
-
100
-
101
-
102
-
103
-
104
 |
 |
