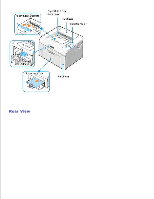
Dell 1100 Laser Mono Printer Dell™ Laser Printer 1100 User's Guide - Page 9
Installing the Starter Toner Cartridge, Button
 |
View all Dell 1100 Laser Mono Printer manuals
Add to My Manuals
Save this manual to your list of manuals |
Page 9 highlights
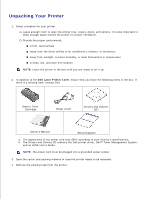
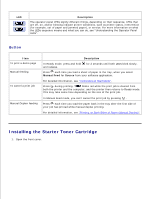
LED Description The operator panel LEDs signify different things, depending on their sequence. LEDs that are off, on, and/or blinking indicate printer conditions, such as printer status, intervention (for example, out of paper and jammed paper), or service. For more information on what the LEDs sequence means and what you can do, see "Understanding the Operator Panel LEDs". Button Item To print a demo page Manual feeding To cancel a print job Manual Duplex feeding Description In Ready mode, press and hold and release. for 2 seconds until both LEDs blink slowly, Press each time you load a sheet of paper in the tray, when you select Manual Feed for Source from your software application. For detailed information, see "Using Manual Feed Mode". Press during printing. blinks red while the print job is cleared from both the printer and the computer, and the printer then returns to Ready mode. This may take some time depending on the size of the print job. In Manual Feed mode, you can't cancel the print job by pressing . Press each time you load the paper back in the tray after the first side of your job has printed while manual duplex printing. For detailed information, see "Printing on Both Sides of Paper (Manual Duplex)". Installing the Starter Toner Cartridge 1. Open the front cover.
-
 1
1 -
2
-
3
-
 4
4 -
 5
5 -
 6
6 -
 7
7 -
 8
8 -
 9
9 -
 10
10 -
 11
11 -
 12
12 -
 13
13 -
 14
14 -
15
-
16
-
17
-
18
-
19
-
20
-
21
-
22
-
23
-
24
-
25
-
26
-
27
-
28
-
29
-
30
-
31
-
32
-
33
-
34
-
35
-
36
-
37
-
38
-
39
-
40
-
41
-
42
-
43
-
44
-
45
-
46
-
47
-
48
-
49
-
50
-
51
-
52
-
53
-
54
-
55
-
56
-
57
-
58
-
59
-
60
-
61
-
62
-
63
-
64
-
65
-
66
-
67
-
68
-
69
-
70
-
71
-
72
-
73
-
74
-
75
-
76
-
77
-
78
-
79
-
80
-
81
-
82
-
83
-
84
-
85
-
86
-
87
-
88
-
89
-
90
-
91
-
92
-
93
 |
 |
