Dell B1163 Dell Users Guide - Page 152
Scan features
 |
View all Dell B1163 manuals
Add to My Manuals
Save this manual to your list of manuals |
Page 152 highlights
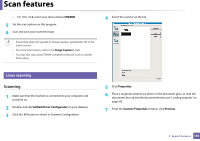
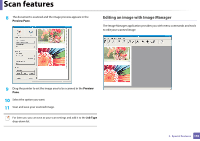
Scan features 7 Setting the scan settings in the computer 8 Scanning from image editing program This feature may not be available depending on model or optional goods (see "Features by models" on page 7). You can scan and import documents at the image editing software such as Adobe Photoshop, if the software is TWAIN-compliant. Follow the steps below to scan with TWAIN-compliant software: 1 Open Dell Printer Manager (see "Using Dell Printer Manager" on page 163). 2 Select the appropriate machine from the Printer List. 3 Select Scan to PC Settings menu. 4 Select the option you want. • Scan Activation: Determines whether or not scanning is enabled on the device. • Basic tab: Contains settings related to general scan and device settings. • Image tab: Contains settings related to image altering. 5 Press Save > OK. 1 Make sure that the machine is connected to your computer and powered on. 2 Place a single document face down on the document glass, or load the documents face up into the document feeder (see "Loading originals" on page 35). 3 Open an application, such as Adobe Photoshop. 4 Click File > Import, and select the scanner device. 5 Set the scan options. 6 Scan and save your scanned image. 3. Special Features 152
-
 1
1 -
2
-
3
-
4
-
5
-
6
-
7
-
8
-
9
-
10
-
11
-
12
-
13
-
14
-
15
-
16
-
17
-
18
-
19
-
20
-
21
-
22
-
23
-
24
-
25
-
26
-
27
-
28
-
29
-
30
-
31
-
32
-
33
-
34
-
35
-
36
-
37
-
38
-
39
-
40
-
41
-
42
-
43
-
44
-
45
-
46
-
47
-
48
-
49
-
50
-
51
-
52
-
53
-
54
-
55
-
56
-
57
-
58
-
59
-
60
-
61
-
62
-
63
-
64
-
65
-
66
-
67
-
68
-
69
-
70
-
71
-
72
-
73
-
74
-
75
-
76
-
77
-
78
-
79
-
80
-
81
-
82
-
83
-
84
-
85
-
86
-
87
-
88
-
89
-
90
-
91
-
92
-
93
-
94
-
95
-
96
-
97
-
98
-
99
-
100
-
101
-
102
-
103
-
104
-
105
-
106
-
107
-
108
-
109
-
110
-
111
-
112
-
113
-
114
-
115
-
116
-
117
-
118
-
119
-
120
-
121
-
122
-
123
-
124
-
125
-
126
-
127
-
128
-
129
-
130
-
131
-
132
-
133
-
134
-
135
-
136
-
137
-
138
-
139
-
140
-
141
-
142
-
143
-
144
-
145
-
146
-
 147
147 -
 148
148 -
 149
149 -
 150
150 -
 151
151 -
 152
152 -
 153
153 -
 154
154 -
 155
155 -
 156
156 -
 157
157 -
158
-
159
-
160
-
161
-
162
-
163
-
164
-
165
-
166
-
167
-
168
-
169
-
170
-
171
-
172
-
173
-
174
-
175
-
176
-
177
-
178
-
179
-
180
-
181
-
182
-
183
-
184
-
185
-
186
-
187
-
188
-
189
-
190
-
191
-
192
-
193
-
194
-
195
-
196
-
197
-
198
-
199
-
200
-
201
-
202
-
203
-
204
-
205
-
206
-
207
 |
 |
