Dell B1163 Dell Users Guide - Page 98
Installation for Mac, For Mac OS X 10.8, double-click the CD/DVD that appears
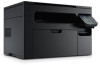 |
View all Dell B1163 manuals
Add to My Manuals
Save this manual to your list of manuals |
Page 98 highlights
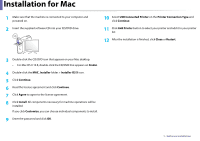
Installation for Mac 1 Make sure that the machine is connected to your computer and powered on. 2 Insert the supplied software CD into your CD/DVD drive. 10 Select USB Connected Printer on the Printer Connection Type and click Continue. 11 Click Add Printer button to select your printer and add it to your printer list. 12 After the installation is finished, click Close or Restart. 3 Double-click the CD/DVD icon that appears on your Mac desktop. • For Mac OS X 10.8, double-click the CD/DVD that appears on Finder. 4 Double-click the MAC_Installer folder > Installer OS X icon. 5 Click Continue. 6 Read the license agreement and click Continue. 7 Click Agree to agree to the license agreement. 8 Click Install. All components necessary for machine operations will be installed. If you click Customize, you can choose individual components to install. 9 Enter the password and click OK. 1. Software Installation 98
-
 1
1 -
2
-
3
-
4
-
5
-
6
-
7
-
8
-
9
-
10
-
11
-
12
-
13
-
14
-
15
-
16
-
17
-
18
-
19
-
20
-
21
-
22
-
23
-
24
-
25
-
26
-
27
-
28
-
29
-
30
-
31
-
32
-
33
-
34
-
35
-
36
-
37
-
38
-
39
-
40
-
41
-
42
-
43
-
44
-
45
-
46
-
47
-
48
-
49
-
50
-
51
-
52
-
53
-
54
-
55
-
56
-
57
-
58
-
59
-
60
-
61
-
62
-
63
-
64
-
65
-
66
-
67
-
68
-
69
-
70
-
71
-
72
-
73
-
74
-
75
-
76
-
77
-
78
-
79
-
80
-
81
-
82
-
83
-
84
-
85
-
86
-
87
-
88
-
89
-
90
-
91
-
92
-
 93
93 -
 94
94 -
 95
95 -
 96
96 -
 97
97 -
 98
98 -
 99
99 -
 100
100 -
 101
101 -
 102
102 -
 103
103 -
104
-
105
-
106
-
107
-
108
-
109
-
110
-
111
-
112
-
113
-
114
-
115
-
116
-
117
-
118
-
119
-
120
-
121
-
122
-
123
-
124
-
125
-
126
-
127
-
128
-
129
-
130
-
131
-
132
-
133
-
134
-
135
-
136
-
137
-
138
-
139
-
140
-
141
-
142
-
143
-
144
-
145
-
146
-
147
-
148
-
149
-
150
-
151
-
152
-
153
-
154
-
155
-
156
-
157
-
158
-
159
-
160
-
161
-
162
-
163
-
164
-
165
-
166
-
167
-
168
-
169
-
170
-
171
-
172
-
173
-
174
-
175
-
176
-
177
-
178
-
179
-
180
-
181
-
182
-
183
-
184
-
185
-
186
-
187
-
188
-
189
-
190
-
191
-
192
-
193
-
194
-
195
-
196
-
197
-
198
-
199
-
200
-
201
-
202
-
203
-
204
-
205
-
206
-
207
 |
 |
