Dell B1163 Dell Users Guide - Page 20
Control panel overview - b1163w toner
 |
View all Dell B1163 manuals
Add to My Manuals
Save this manual to your list of manuals |
Page 20 highlights
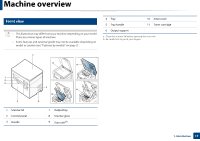
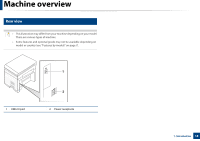
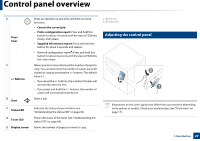
Control panel overview 8 Stop/ Clear 9 +/- Buttons 10 Start Stops an operation at any time and there are more functions. • Cancels the current job. • Prints configuration report: Press and hold this button for about 2 seconds until the status LED blinks slowly, and release. • Supplied Information report: Press and hold this button for about 6 seconds and release. • Network configuration reportb: Press and hold this button for about 4 seconds until the status LED blinks fast, and release. Allows you to increase/decrease the number of pages to copy. You can determine the number of copies (up to 99 copies) to copy by pressing the +/- buttons. The default value is 1. • If you press the +/- buttons, the number of copies will increase/decrease by one. • If you press and hold the +/- buttons, the number of copies will increase/decrease by ten. Starts a job. 11 Status LED 12 Toner LED 13 Display screen Indicates the status of your machine (see "Understanding the status LED" on page 69). Shows the status of the toner (see "Understanding the status LED" on page 69). Shows the number of pages you want to copy. a. B1163 only. b. B1163w only. 12 Adjusting the control panel Illustrations on this user's guide may differ from your machine depending on its options or models. Check your machine type (see "Front view" on page 17). 1. Introduction 20
-
 1
1 -
2
-
3
-
4
-
5
-
6
-
7
-
8
-
9
-
10
-
11
-
12
-
13
-
14
-
 15
15 -
 16
16 -
 17
17 -
 18
18 -
 19
19 -
 20
20 -
 21
21 -
 22
22 -
 23
23 -
 24
24 -
 25
25 -
26
-
27
-
28
-
29
-
30
-
31
-
32
-
33
-
34
-
35
-
36
-
37
-
38
-
39
-
40
-
41
-
42
-
43
-
44
-
45
-
46
-
47
-
48
-
49
-
50
-
51
-
52
-
53
-
54
-
55
-
56
-
57
-
58
-
59
-
60
-
61
-
62
-
63
-
64
-
65
-
66
-
67
-
68
-
69
-
70
-
71
-
72
-
73
-
74
-
75
-
76
-
77
-
78
-
79
-
80
-
81
-
82
-
83
-
84
-
85
-
86
-
87
-
88
-
89
-
90
-
91
-
92
-
93
-
94
-
95
-
96
-
97
-
98
-
99
-
100
-
101
-
102
-
103
-
104
-
105
-
106
-
107
-
108
-
109
-
110
-
111
-
112
-
113
-
114
-
115
-
116
-
117
-
118
-
119
-
120
-
121
-
122
-
123
-
124
-
125
-
126
-
127
-
128
-
129
-
130
-
131
-
132
-
133
-
134
-
135
-
136
-
137
-
138
-
139
-
140
-
141
-
142
-
143
-
144
-
145
-
146
-
147
-
148
-
149
-
150
-
151
-
152
-
153
-
154
-
155
-
156
-
157
-
158
-
159
-
160
-
161
-
162
-
163
-
164
-
165
-
166
-
167
-
168
-
169
-
170
-
171
-
172
-
173
-
174
-
175
-
176
-
177
-
178
-
179
-
180
-
181
-
182
-
183
-
184
-
185
-
186
-
187
-
188
-
189
-
190
-
191
-
192
-
193
-
194
-
195
-
196
-
197
-
198
-
199
-
200
-
201
-
202
-
203
-
204
-
205
-
206
-
207
 |
 |
