Dell B1163 Dell Users Guide - Page 180
Condition, Suggested solutions, Vertical lines, Black or color background, Toner smear
 |
View all Dell B1163 manuals
Add to My Manuals
Save this manual to your list of manuals |
Page 180 highlights
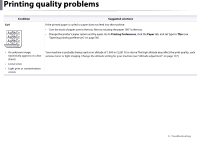
Printing quality problems Condition Vertical lines Black or color background Toner smear Suggested solutions If black vertical streaks appear on the page: • The surface (drum part) of the toner cartridge inside the machine has probably been scratched. Remove the toner cartridge and install a new one (see "Replacing the toner cartridge" on page 54). If white vertical streaks appear on the page: • The surface of the LSU part inside the machine may be dirty. Clean the inside of your machine (see "Cleaning the machine" on page 56). If these steps do not correct the problem, contact a service representative. If the amount of background shading becomes unacceptable: • Change to a lighter weight paper. • Check the environmental conditions: very dry conditions or a high level of humidity (higher than 80% RH) can increase the amount of background shading. • Remove the old toner cartridge and install a new one (see "Replacing the toner cartridge" on page 54). • Thoroughly redistribute the toner (see "Redistributing toner" on page 52). • Clean the inside of the machine (see "Cleaning the machine" on page 56). • Check the paper type and quality. • Remove the toner cartridge and install a new one (see "Replacing the toner cartridge" on page 54). 5. Troubleshooting 180
-
 1
1 -
2
-
3
-
4
-
5
-
6
-
7
-
8
-
9
-
10
-
11
-
12
-
13
-
14
-
15
-
16
-
17
-
18
-
19
-
20
-
21
-
22
-
23
-
24
-
25
-
26
-
27
-
28
-
29
-
30
-
31
-
32
-
33
-
34
-
35
-
36
-
37
-
38
-
39
-
40
-
41
-
42
-
43
-
44
-
45
-
46
-
47
-
48
-
49
-
50
-
51
-
52
-
53
-
54
-
55
-
56
-
57
-
58
-
59
-
60
-
61
-
62
-
63
-
64
-
65
-
66
-
67
-
68
-
69
-
70
-
71
-
72
-
73
-
74
-
75
-
76
-
77
-
78
-
79
-
80
-
81
-
82
-
83
-
84
-
85
-
86
-
87
-
88
-
89
-
90
-
91
-
92
-
93
-
94
-
95
-
96
-
97
-
98
-
99
-
100
-
101
-
102
-
103
-
104
-
105
-
106
-
107
-
108
-
109
-
110
-
111
-
112
-
113
-
114
-
115
-
116
-
117
-
118
-
119
-
120
-
121
-
122
-
123
-
124
-
125
-
126
-
127
-
128
-
129
-
130
-
131
-
132
-
133
-
134
-
135
-
136
-
137
-
138
-
139
-
140
-
141
-
142
-
143
-
144
-
145
-
146
-
147
-
148
-
149
-
150
-
151
-
152
-
153
-
154
-
155
-
156
-
157
-
158
-
159
-
160
-
161
-
162
-
163
-
164
-
165
-
166
-
167
-
168
-
169
-
170
-
171
-
172
-
173
-
174
-
 175
175 -
 176
176 -
 177
177 -
 178
178 -
 179
179 -
 180
180 -
 181
181 -
 182
182 -
 183
183 -
 184
184 -
 185
185 -
186
-
187
-
188
-
189
-
190
-
191
-
192
-
193
-
194
-
195
-
196
-
197
-
198
-
199
-
200
-
201
-
202
-
203
-
204
-
205
-
206
-
207
 |
 |
