Dell FC4500 Reference Guide - Page 77
At the back of the deskside DPE, gently insert the SP or filler, module as shown below.
 |
View all Dell FC4500 manuals
Add to My Manuals
Save this manual to your list of manuals |
Page 77 highlights
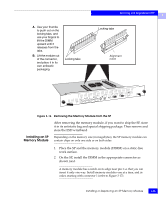
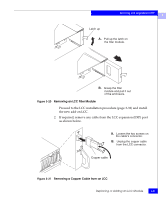
Servicing and Upgrading a DPE 3 2. At the back of the deskside DPE, gently insert the SP or filler module as shown below. A. Open the ejectors as far as possible; then gently push the module into the enclosure guides, supporting it at both sides. Ejector (one each side) B. Close both ejector handles simultaneously to fully seat the SP module. Retaining screw (one each side) C. Tighten the retaining screws. Figure 3-19 Installing an SP or SP Filler Module Installing an SP or SP Filler Module 3-29
-
 1
1 -
2
-
3
-
4
-
5
-
6
-
7
-
8
-
9
-
10
-
11
-
12
-
13
-
14
-
15
-
16
-
17
-
18
-
19
-
20
-
21
-
22
-
23
-
24
-
25
-
26
-
27
-
28
-
29
-
30
-
31
-
32
-
33
-
34
-
35
-
36
-
37
-
38
-
39
-
40
-
41
-
42
-
43
-
44
-
45
-
46
-
47
-
48
-
49
-
50
-
51
-
52
-
53
-
54
-
55
-
56
-
57
-
58
-
59
-
60
-
61
-
62
-
63
-
64
-
65
-
66
-
67
-
68
-
69
-
70
-
71
-
 72
72 -
 73
73 -
 74
74 -
 75
75 -
 76
76 -
 77
77 -
 78
78 -
 79
79 -
 80
80 -
 81
81 -
 82
82 -
83
-
84
-
85
-
86
-
87
-
88
-
89
-
90
-
91
-
92
-
93
-
94
-
95
-
96
-
97
-
98
-
99
-
100
-
101
-
102
-
103
-
104
-
105
-
106
-
107
-
108
-
109
-
110
 |
 |

3
Installing an SP or SP Filler Module
3-29
Servicing and Upgrading a DPE
2.
At the back of the deskside DPE, gently insert the SP or filler
module as shown below.
Figure 3-19
Installing an SP or SP Filler Module
A.
Open the ejectors as far as
possible; then gently push
the module into the
enclosure guides,
supporting it at both sides.
B.
Close both ejector handles
simultaneously to fully seat
the SP module.
C.
Tighten the retaining
screws.
Ejector
(one each side)
Retaining screw
(one each side)