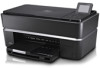
Dell P703w All In One Photo Printer Dell Photo P703w All-In-One Printer User's - Page 28
Number Part, NOTICE
 |
View all Dell P703w All In One Photo Printer manuals
Add to My Manuals
Save this manual to your list of manuals |
Page 28 highlights
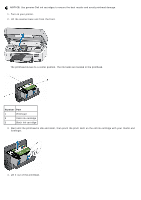
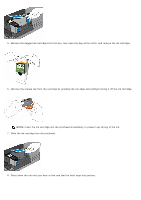
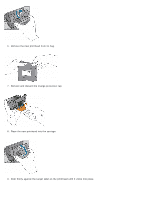
NOTICE: Use genuine Dell ink cartridges to ensure the best results and avoid printhead damage. 1. Turn on your printer. 2. Lift the scanner base unit from the front. The printhead moves to a center position. The ink tanks are located in the printhead. Number Part 1 Printhead 2 Color ink cartridge 3 Black ink cartridge 3. Wait until the printhead is idle and silent, then pinch the pinch latch on the old ink cartridge with your thumb and forefinger. 4. Lift it out of the printhead.
-
 1
1 -
2
-
3
-
4
-
5
-
6
-
7
-
8
-
9
-
10
-
11
-
12
-
13
-
14
-
15
-
16
-
17
-
18
-
19
-
20
-
21
-
22
-
 23
23 -
 24
24 -
 25
25 -
 26
26 -
 27
27 -
 28
28 -
 29
29 -
 30
30 -
 31
31 -
 32
32 -
 33
33 -
34
-
35
-
36
-
37
-
38
-
39
-
40
-
41
-
42
-
43
-
44
-
45
-
46
-
47
-
48
-
49
-
50
-
51
-
52
-
53
-
54
-
55
-
56
-
57
-
58
-
59
-
60
-
61
-
62
-
63
-
64
-
65
-
66
-
67
-
68
-
69
-
70
-
71
-
72
-
73
-
74
-
75
-
76
-
77
-
78
-
79
-
80
-
81
-
82
-
83
-
84
-
85
-
86
-
87
-
88
-
89
-
90
-
91
-
92
-
93
-
94
-
95
-
96
-
97
-
98
-
99
-
100
-
101
-
102
-
103
-
104
-
105
 |
 |

NOTICE:
Use genuine Dell ink cartridges to ensure the best results and avoid printhead damage.
1. Turn on your printer.
2. Lift the scanner base unit from the front.
The printhead moves to a center position. The ink tanks are located in the printhead.
Number Part
1
Printhead
2
Color ink cartridge
3
Black ink cartridge
3. Wait until the printhead is idle and silent, then pinch the pinch latch on the old ink cartridge with your thumb and
forefinger.
4. Lift it out of the printhead.