Dell P703w All In One Photo Printer Dell Photo P703w All-In-One Printer User's - Page 45
Copying Problems, Fit to Fill
 |
View all Dell P703w All In One Photo Printer manuals
Add to My Manuals
Save this manual to your list of manuals |
Page 45 highlights
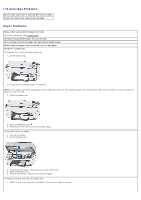
Printing Stops. Printing stops during mid-print. Paper stops feeding, and Status light may blink. NOTE: For best results, use only Dell Ink cartridges and paper for your printer. Check the paper 1. Disengage the photo tray if engaged. 2. Check the paper access on the back of the printer. 3. Remove any loose paper from the printer. 4. Inspect the paper supplies and reload with new paper if necessary. 5. Carefully "fan" the paper to keep the sheets from sticking together. 6. Reload the paper trays. Do not overload. 7. Re-engage the photo tray, if desired, and then press Start to resume printing. Slow Printing. NOTE: When printing a large number of prints, printing may slow down to prevent the print head from overheating. Ensure that the printer is not placed in direct sunlight or is not operating in a high-temperature environment (higher than 95° F, or 35° C). Close unnecessary software applications. Ensure that your computer meets the minimum system requirements. Upgrade your system if necessary. White Edges on Borderless Prints. Probable Cause White edges can appear when there are slight misalignments between the printer and paper. Some software applications are able to "hide" these small misalignments so that the prints look borderless like they are supposed to. Use the application's Fit to Page/Fill Page option, or resize the picture so it is slightly larger than the paper size. Copying Problems Check for blinking lights or error messages on the printer. For more information, see Error Messages. Ensure that the scanner glass is clean. If the scanner glass is dirty, gently wipe it with a clean, lint-free cloth dampened with water. Check paper sizes. Ensure that the paper size being used matches the size you selected on the operator panel or the Dell Imaging Toolbox. Copies faded or dull colors. Probable Cause 1 The copy quality is set to Draft. Set the copy quality to Normal or Best. For more information, see Changing Copy Settings. Probable Cause 2 The brightness setting for copies is set too light. Adjust the brightness setting to darker. For more information, see Changing Copy Settings. Copies too Light or Dark. The brightness setting for copies is set too light or dark. Adjust the brightness setting for copies For more information, see Changing Copy Settings. Copy Cut Off. The original is larger than the paper loaded. When the original is larger than the paper loaded, use the Fit to Page option to reduce your original to the size of the paper loaded. Scanning Problems Check for blinking lights and error messages on the printer. Check the USB cable. Ensure that the USB cable is firmly connected to your printer and your computer. Shut down the computer, reconnect the USB cable as shown on the Setting Up Your Printer poster, and then restart the computer. Determine if the printer software is installed. Click Start® Programs or All Programs® Dell Printers.
-
 1
1 -
2
-
3
-
4
-
5
-
6
-
7
-
8
-
9
-
10
-
11
-
12
-
13
-
14
-
15
-
16
-
17
-
18
-
19
-
20
-
21
-
22
-
23
-
24
-
25
-
26
-
27
-
28
-
29
-
30
-
31
-
32
-
33
-
34
-
35
-
36
-
37
-
38
-
39
-
 40
40 -
 41
41 -
 42
42 -
 43
43 -
 44
44 -
 45
45 -
 46
46 -
 47
47 -
 48
48 -
 49
49 -
 50
50 -
51
-
52
-
53
-
54
-
55
-
56
-
57
-
58
-
59
-
60
-
61
-
62
-
63
-
64
-
65
-
66
-
67
-
68
-
69
-
70
-
71
-
72
-
73
-
74
-
75
-
76
-
77
-
78
-
79
-
80
-
81
-
82
-
83
-
84
-
85
-
86
-
87
-
88
-
89
-
90
-
91
-
92
-
93
-
94
-
95
-
96
-
97
-
98
-
99
-
100
-
101
-
102
-
103
-
104
-
105
 |
 |
