Dell P703w All In One Photo Printer Dell Photo P703w All-In-One Printer User's - Page 33
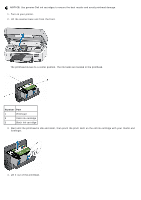
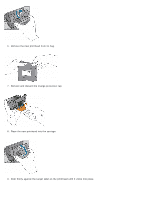
Push firmly against the target label on the printhead until it clicks into place.
 |
View all Dell P703w All In One Photo Printer manuals
Add to My Manuals
Save this manual to your list of manuals |
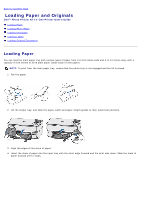
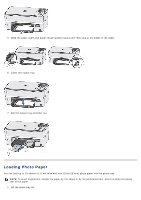
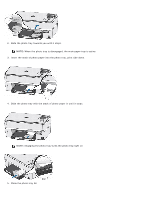
Page 33 highlights
6. Remove the new printhead from its bag. 7. Remove and discard the orange protective cap. 8. Place the new printhead into the carriage. 9. Push firmly against the target label on the printhead until it clicks into place.
-
 1
1 -
2
-
3
-
4
-
5
-
6
-
7
-
8
-
9
-
10
-
11
-
12
-
13
-
14
-
15
-
16
-
17
-
18
-
19
-
20
-
21
-
22
-
23
-
24
-
25
-
26
-
27
-
 28
28 -
 29
29 -
 30
30 -
 31
31 -
 32
32 -
 33
33 -
 34
34 -
 35
35 -
 36
36 -
 37
37 -
 38
38 -
39
-
40
-
41
-
42
-
43
-
44
-
45
-
46
-
47
-
48
-
49
-
50
-
51
-
52
-
53
-
54
-
55
-
56
-
57
-
58
-
59
-
60
-
61
-
62
-
63
-
64
-
65
-
66
-
67
-
68
-
69
-
70
-
71
-
72
-
73
-
74
-
75
-
76
-
77
-
78
-
79
-
80
-
81
-
82
-
83
-
84
-
85
-
86
-
87
-
88
-
89
-
90
-
91
-
92
-
93
-
94
-
95
-
96
-
97
-
98
-
99
-
100
-
101
-
102
-
103
-
104
-
105
 |
 |

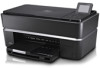
6. Remove the new printhead from its bag.
7. Remove and discard the orange protective cap.
8. Place the new printhead into the carriage.
9. Push firmly against the target label on the printhead until it clicks into place.