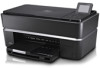
Dell P703w All In One Photo Printer Dell Photo P703w All-In-One Printer User's - Page 32
Replacing the Printhead, Select, Clean Printhead menu, Arrow
 |
View all Dell P703w All In One Photo Printer manuals
Add to My Manuals
Save this manual to your list of manuals |
Page 32 highlights
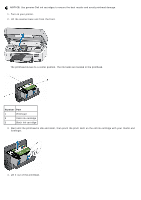
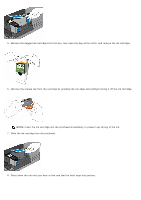
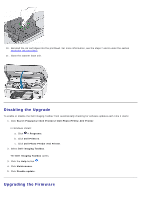
3. Press the Select button to go to Clean Printhead menu. 4. Press the Select button to perform a Basic Clean. or Press the down Arrow button to select Deep Clean and press the Select button to perform a Deep Clean. Replacing the Printhead NOTE: The printhead need not be changed normally, during the lifespan of the printer. 1. Turn on your printer. 2. Lift the scanner base unit from the front. The printhead moves to a center position. Wait until the printhead is idle and silent. 3. Remove the ink cartridges. For more information, see the steps 3 and 4 under the section Replacing Ink Cartridges. 4. Lift the printhead latch to release the printhead from the carriage. 5. Remove the old printhead from the carriage.
-
 1
1 -
2
-
3
-
4
-
5
-
6
-
7
-
8
-
9
-
10
-
11
-
12
-
13
-
14
-
15
-
16
-
17
-
18
-
19
-
20
-
21
-
22
-
23
-
24
-
25
-
26
-
 27
27 -
 28
28 -
 29
29 -
 30
30 -
 31
31 -
 32
32 -
 33
33 -
 34
34 -
 35
35 -
 36
36 -
 37
37 -
38
-
39
-
40
-
41
-
42
-
43
-
44
-
45
-
46
-
47
-
48
-
49
-
50
-
51
-
52
-
53
-
54
-
55
-
56
-
57
-
58
-
59
-
60
-
61
-
62
-
63
-
64
-
65
-
66
-
67
-
68
-
69
-
70
-
71
-
72
-
73
-
74
-
75
-
76
-
77
-
78
-
79
-
80
-
81
-
82
-
83
-
84
-
85
-
86
-
87
-
88
-
89
-
90
-
91
-
92
-
93
-
94
-
95
-
96
-
97
-
98
-
99
-
100
-
101
-
102
-
103
-
104
-
105
 |
 |

3. Press the
Select
button
to go to
Clean Printhead menu
.
4. Press the
Select
button
to perform a Basic Clean.
or
Press the down
Arrow
button
to select Deep Clean and press the
Select
button
to perform a Deep Clean.
Replacing the Printhead
NOTE:
The printhead need not be changed normally, during the lifespan of the printer.
1. Turn on your printer.
2. Lift the scanner base unit from the front.
The printhead moves to a center position. Wait until the printhead is idle and silent.
3. Remove the ink cartridges. For more information, see the steps 3 and 4 under the section
Replacing Ink Cartridges
.
4. Lift the printhead latch to release the printhead from the carriage.
5. Remove the old printhead from the carriage.