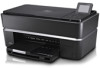
Dell P703w All In One Photo Printer Dell Photo P703w All-In-One Printer User's - Page 44
Edit the picture using Adobe Photoshop Album SE software on your computer. See the Adobe Photoshop Album SE Help for details. - best all in one photo printer reviews
 |
View all Dell P703w All In One Photo Printer manuals
Add to My Manuals
Save this manual to your list of manuals |
Page 44 highlights
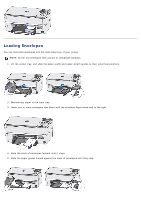
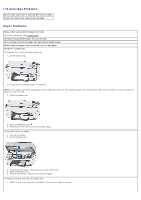
1. Remove the envelopes from the main paper tray. 2. Straighten the stack of envelopes against a flat surface, and reload it into the main paper tray. 3. Slide the paper-width and paper-length guides inward until they stop at the edges of the envelopes. Multiple-page document in reverse order. The printing settings are set to print the first page of your document first. Print the document in reverse order so the pages will be in the correct order when printing finishes. 1. Click the Properties button on the Print dialog. 2. Select Print last page first on the General tab. Photo print appears smudged. To avoid photo print smudging, Fingerprints may be on glossy side of paper. Handle paper by the edges. PictBridge camera not detected. 1. Check the USB connections from the PictBridge compatible camera or device to the printer. 2. If disconnected, reconnect the USB cable from the PictBridge compatible camera or device to the printer. 3. Ensure that there is at least one picture in the PictBridge compatible camera or device's internal memory or memory card. 4. Ensurethat the connected camera or device is PictBridge compatible. See your camera or device user's guide for details. Picture does not print. A selected picture does not print. The image file may be corrupt. Review the picture on the camera or computer and delete if necessary. The image file may not be JPEG format. The printer can only print JPEG files in standalone mode. Connect to a computer and use Adobe Photoshop Album SE software to print BMP and TIFF formats. Pictures cropped. Change the picture quality setting (or resolution) on your digital camera to 3:2. See your camera user's guide for details. Adjust cropped pictures using Adobe Photoshop Album SE software on your computer. If you are printing from an application on your computer, select the proper paper size in print options. NOTE: Cropping may vary depending on the selected picture size. Poor print quality. 1. Clean the printhead. 2. Run a calibration. If the problem persists, repeat as often as necessary. Print skewed or slanted. Probable Cause 1 The paper is not properly loaded in the tray. 1. Remove the stack of paper from the main paper tray, and slide the paper guides to the outermost position. 2. Remove the paper and check for wrinkles and tears. 3. Straighten the stack of paper against a flat surface, and reload it into the main paper tray. 4. Slide the paper-width and paper-length guides inward until they stop at the edges of the paper. For more information, see Loading Paper. Probable Cause 2 More than one type of paper is loaded. Load only one type of paper. Print spotted. Paper may be dirty. Use a dry, lint-free cloth to wipe clean. For excessive dirt or debris, thoroughly clean the paper tray, and load new paper. NOTE: Keep paper tray covers closed to keep dust and debris from collecting on the paper or inside the printer. Print too dark. NOTE: For best results, use only Dell Ink cartridges and paper for your printer. Try re-taking the picture with the flash on, or move within the flash range of the camera. See your camera user's guide for details. Adjust the exposure compensation on your camera, and try re-taking the picture. See your camera user's guide for details. Edit the picture using Adobe Photoshop Album SE software on your computer. See the Adobe Photoshop Album SE Help for details. Ensure that the printer is not placed in direct sunlight or is not operating in a high-temperature environment. Print too light. NOTE: For best results, use only Dell Ink cartridges and paper for your printer. Ensure that the paper is loaded with the Dell logo facing up. Reload if necessary. Try re-taking the picture with the flash off. See your camera user's guide for details. Adjust the exposure compensation on your camera, and try re-taking the picture. See your camera user's guide for details. Edit the picture using Adobe Photoshop Album SE software on your computer. See the Adobe Photoshop Album SE software Help for details.
-
 1
1 -
2
-
3
-
4
-
5
-
6
-
7
-
8
-
9
-
10
-
11
-
12
-
13
-
14
-
15
-
16
-
17
-
18
-
19
-
20
-
21
-
22
-
23
-
24
-
25
-
26
-
27
-
28
-
29
-
30
-
31
-
32
-
33
-
34
-
35
-
36
-
37
-
38
-
 39
39 -
 40
40 -
 41
41 -
 42
42 -
 43
43 -
 44
44 -
 45
45 -
 46
46 -
 47
47 -
 48
48 -
 49
49 -
50
-
51
-
52
-
53
-
54
-
55
-
56
-
57
-
58
-
59
-
60
-
61
-
62
-
63
-
64
-
65
-
66
-
67
-
68
-
69
-
70
-
71
-
72
-
73
-
74
-
75
-
76
-
77
-
78
-
79
-
80
-
81
-
82
-
83
-
84
-
85
-
86
-
87
-
88
-
89
-
90
-
91
-
92
-
93
-
94
-
95
-
96
-
97
-
98
-
99
-
100
-
101
-
102
-
103
-
104
-
105
 |
 |
