Dell PowerConnect Brocade M6505 Brocade 7.1.0 Access Gateway Administrator's G - Page 81
Enabling trunking, Disabling F_Port trunking, Monitoring trunking
 |
View all Dell PowerConnect Brocade M6505 manuals
Add to My Manuals
Save this manual to your list of manuals |
Page 81 highlights
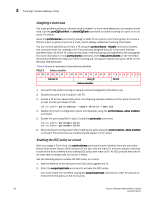
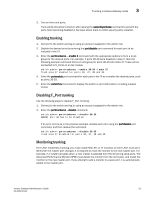
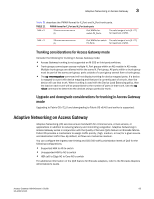
Trunking in Access Gateway mode 3 3. Turn on the trunk ports. Trunk ports should be turned on after issuing the secpolicyactivate command to prevent the ports from becoming disabled in the case where there is a DCC security policy violation. Enabling trunking 1. Connect to the switch and log in using an account assigned to the admin role. 2. Disable the desired ports by entering the portdisable port command for each port to be included in the TA. 3. Enter the porttrunkarea--enable 3 command with the appropriate options to form a trunk group for the desired ports. For example, if ports 36-39 were disabled in step 2, then the following example command forms a trunk group for ports 36-39 with index 37. These will be connected to N_Ports on an AG module. switch:admin> porttrunkarea --enable 36-39 -index 37 Trunk area 37 enabled for ports 36, 37, 38 and 39. 4. Enter the portenable port command for each port in the TA to re-enable the desired ports, such as ports 36-39. 5. Enter the switchhow command to display the switch or port information, including created trunks. Disabling F_Port trunking Use the following steps to disable F_Port trunking. 1. Connect to the switch and log in using an account assigned to the admin role. 2. Enter the porttrunkarea --disable command. switch:admin> porttrunkarea --disable 36-39 ERROR: port 36 has to be disabled If an error occurs as in the previous example, disable each port using the portdisable port command, and then reissue the command. switch:admin> porttrunkarea --disable 36-39 trunk area 37 disabled for ports 36, 37, 38 and 39. Monitoring trunking For F_Port masterless trunking, you must install Filter, EE, or TT monitors on the F_Port trunk port. Whenever the master port changes, it is required to move the monitor to the new master port. For example, if a master port goes down, a new master is selected from the remaining slave ports. The Advanced Performance Monitor (APM) must delete the monitor from the old master and install the monitor on the new master port. If you attempt to add a monitor to a slave port, it is automatically added to the master port. Access Gateway Administrator's Guide 61 53-1002743-01
-
 1
1 -
2
-
3
-
4
-
5
-
6
-
7
-
8
-
9
-
10
-
11
-
12
-
13
-
14
-
15
-
16
-
17
-
18
-
19
-
20
-
21
-
22
-
23
-
24
-
25
-
26
-
27
-
28
-
29
-
30
-
31
-
32
-
33
-
34
-
35
-
36
-
37
-
38
-
39
-
40
-
41
-
42
-
43
-
44
-
45
-
46
-
47
-
48
-
49
-
50
-
51
-
52
-
53
-
54
-
55
-
56
-
57
-
58
-
59
-
60
-
61
-
62
-
63
-
64
-
65
-
66
-
67
-
68
-
69
-
70
-
71
-
72
-
73
-
74
-
75
-
 76
76 -
 77
77 -
 78
78 -
 79
79 -
 80
80 -
 81
81 -
 82
82 -
 83
83 -
 84
84 -
 85
85 -
 86
86 -
87
-
88
-
89
-
90
-
91
-
92
-
93
-
94
-
95
-
96
-
97
-
98
-
99
-
100
-
101
-
102
-
103
-
104
-
105
-
106
-
107
-
108
 |
 |