Dell W5300n Dell™ Workgroup Laser Printer W5300 User's Guide - Page 200
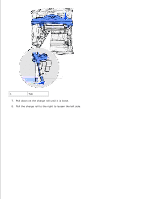
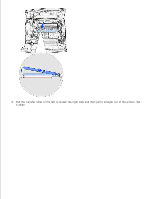
Replacing the charge roll, Pull the upper front door halfway down.
 |
View all Dell W5300n manuals
Add to My Manuals
Save this manual to your list of manuals |
Page 200 highlights
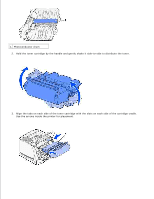
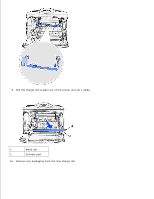
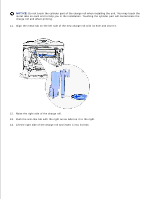
1 Tab 2 Slot 4. Guide the toner cartridge in until it snaps into place. 5. Close the upper door, and then the lower door. 6. Turn the printer on. Replacing the charge roll Order a new charge roll kit when toner fog or background shading appears on printed pages. See Ordering supplies for information on ordering a charge roll. 1. Turn the printer off and unplug the printer power cord. 2. Open the front doors and remove the toner cartridge. 3. Pull the upper front door halfway down. 4. Locate the used charge roll above the area for the toner cartridge. 5. Locate the label with an arrow on the right side of the housing. It is attached to the arm-like tab. 6. Push the arm-like tab to the right to release the charge roll.
-
 1
1 -
2
-
3
-
4
-
5
-
6
-
7
-
8
-
9
-
10
-
11
-
12
-
13
-
14
-
15
-
16
-
17
-
18
-
19
-
20
-
21
-
22
-
23
-
24
-
25
-
26
-
27
-
28
-
29
-
30
-
31
-
32
-
33
-
34
-
35
-
36
-
37
-
38
-
39
-
40
-
41
-
42
-
43
-
44
-
45
-
46
-
47
-
48
-
49
-
50
-
51
-
52
-
53
-
54
-
55
-
56
-
57
-
58
-
59
-
60
-
61
-
62
-
63
-
64
-
65
-
66
-
67
-
68
-
69
-
70
-
71
-
72
-
73
-
74
-
75
-
76
-
77
-
78
-
79
-
80
-
81
-
82
-
83
-
84
-
85
-
86
-
87
-
88
-
89
-
90
-
91
-
92
-
93
-
94
-
95
-
96
-
97
-
98
-
99
-
100
-
101
-
102
-
103
-
104
-
105
-
106
-
107
-
108
-
109
-
110
-
111
-
112
-
113
-
114
-
115
-
116
-
117
-
118
-
119
-
120
-
121
-
122
-
123
-
124
-
125
-
126
-
127
-
128
-
129
-
130
-
131
-
132
-
133
-
134
-
135
-
136
-
137
-
138
-
139
-
140
-
141
-
142
-
143
-
144
-
145
-
146
-
147
-
148
-
149
-
150
-
151
-
152
-
153
-
154
-
155
-
156
-
157
-
158
-
159
-
160
-
161
-
162
-
163
-
164
-
165
-
166
-
167
-
168
-
169
-
170
-
171
-
172
-
173
-
174
-
175
-
176
-
177
-
178
-
179
-
180
-
181
-
182
-
183
-
184
-
185
-
186
-
187
-
188
-
189
-
190
-
191
-
192
-
193
-
194
-
 195
195 -
 196
196 -
 197
197 -
 198
198 -
 199
199 -
 200
200 -
 201
201 -
 202
202 -
 203
203 -
 204
204 -
 205
205 -
206
-
207
-
208
-
209
-
210
-
211
-
212
-
213
-
214
-
215
-
216
-
217
-
218
-
219
-
220
-
221
-
222
-
223
-
224
-
225
-
226
-
227
-
228
-
229
-
230
-
231
-
232
 |
 |

1
Tab
2
Slot
Guide the toner cartridge in until it
snaps
into place.
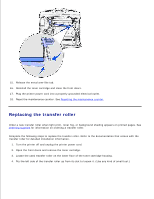
4.
Close the upper door, and then the lower door.
5.
Turn the printer on.
6.
Replacing the charge roll
Order a new charge roll kit when toner fog or background shading appears on printed pages. See
Ordering
supplies
for information on ordering a charge roll.
Turn the printer off and unplug the printer power cord.
1.
Open the front doors and remove the toner cartridge.
2.
Pull the upper front door halfway down.
3.
Locate the used charge roll above the area for the toner cartridge.
4.
Locate the label with an arrow on the right side of the housing. It is attached to the arm-like tab.
5.
Push the arm-like tab to the right to release the charge roll.
6.