Dell W5300n Dell™ Workgroup Laser Printer W5300 User's Guide - Page 27
Use the decals shipped with any optional drawer to mark it appropriately. Peel the decals from
 |
View all Dell W5300n manuals
Add to My Manuals
Save this manual to your list of manuals |
Page 27 highlights
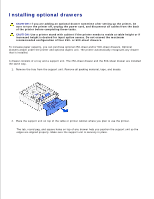
1 Tab 2 Round peg 3 Square hole 3. Attach decals to the trays. Decals showing the number "1" are on your printer and the standard tray. These decals keep the standard tray paired with the printer. Use the decals shipped with any optional drawer to mark it appropriately. Peel the decals from the sheet and attach them to the recessed areas on the optional drawers and the matching trays. 4. Print a menu settings page to verify the optional tray is installed properly. a. Turn the printer on. b.
-
 1
1 -
2
-
3
-
4
-
5
-
6
-
7
-
8
-
9
-
10
-
11
-
12
-
13
-
14
-
15
-
16
-
17
-
18
-
19
-
20
-
21
-
 22
22 -
 23
23 -
 24
24 -
 25
25 -
 26
26 -
 27
27 -
 28
28 -
 29
29 -
 30
30 -
 31
31 -
 32
32 -
33
-
34
-
35
-
36
-
37
-
38
-
39
-
40
-
41
-
42
-
43
-
44
-
45
-
46
-
47
-
48
-
49
-
50
-
51
-
52
-
53
-
54
-
55
-
56
-
57
-
58
-
59
-
60
-
61
-
62
-
63
-
64
-
65
-
66
-
67
-
68
-
69
-
70
-
71
-
72
-
73
-
74
-
75
-
76
-
77
-
78
-
79
-
80
-
81
-
82
-
83
-
84
-
85
-
86
-
87
-
88
-
89
-
90
-
91
-
92
-
93
-
94
-
95
-
96
-
97
-
98
-
99
-
100
-
101
-
102
-
103
-
104
-
105
-
106
-
107
-
108
-
109
-
110
-
111
-
112
-
113
-
114
-
115
-
116
-
117
-
118
-
119
-
120
-
121
-
122
-
123
-
124
-
125
-
126
-
127
-
128
-
129
-
130
-
131
-
132
-
133
-
134
-
135
-
136
-
137
-
138
-
139
-
140
-
141
-
142
-
143
-
144
-
145
-
146
-
147
-
148
-
149
-
150
-
151
-
152
-
153
-
154
-
155
-
156
-
157
-
158
-
159
-
160
-
161
-
162
-
163
-
164
-
165
-
166
-
167
-
168
-
169
-
170
-
171
-
172
-
173
-
174
-
175
-
176
-
177
-
178
-
179
-
180
-
181
-
182
-
183
-
184
-
185
-
186
-
187
-
188
-
189
-
190
-
191
-
192
-
193
-
194
-
195
-
196
-
197
-
198
-
199
-
200
-
201
-
202
-
203
-
204
-
205
-
206
-
207
-
208
-
209
-
210
-
211
-
212
-
213
-
214
-
215
-
216
-
217
-
218
-
219
-
220
-
221
-
222
-
223
-
224
-
225
-
226
-
227
-
228
-
229
-
230
-
231
-
232
 |
 |
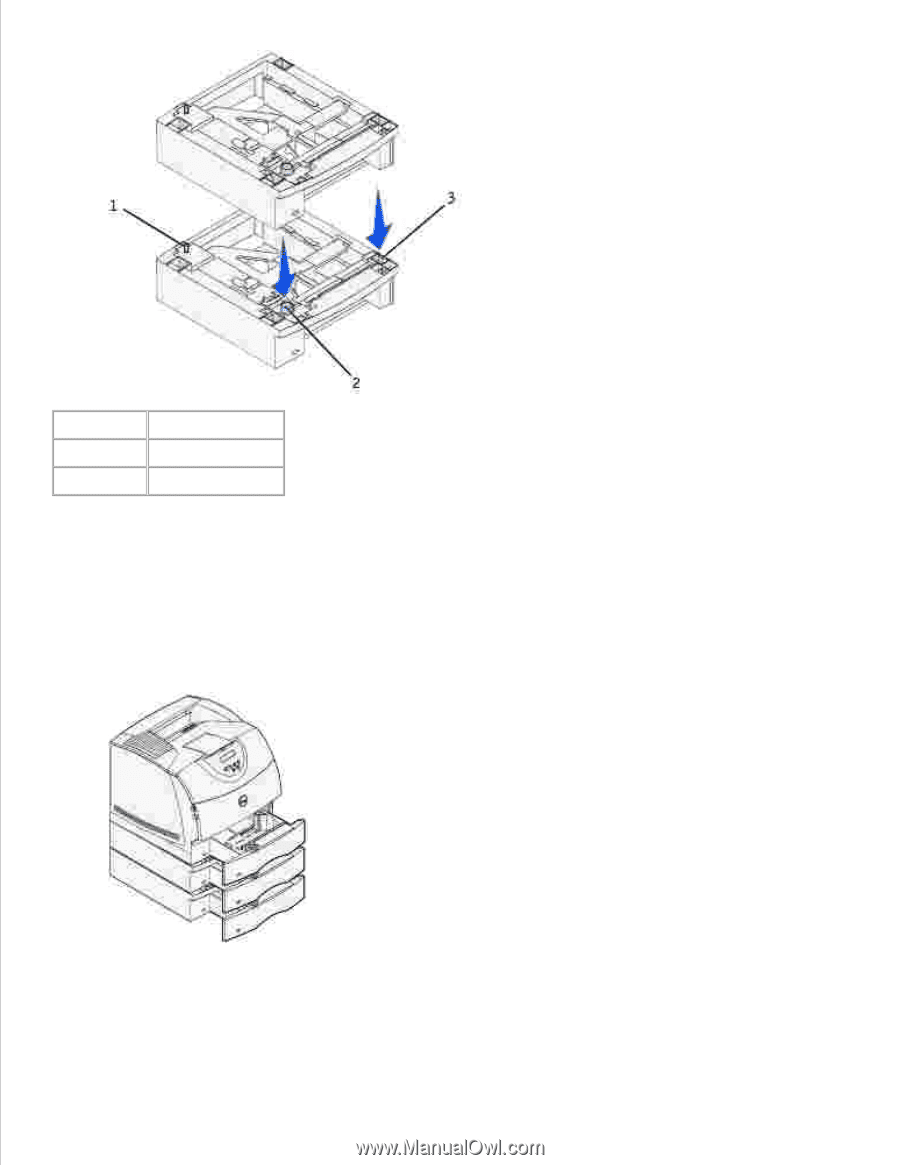
1
Tab
2
Round peg
3
Square hole
Attach decals to the trays.
3.
Decals showing the number "1" are on your printer and the standard tray. These decals keep the
standard tray paired with the printer.
Use the decals shipped with any optional drawer to mark it appropriately. Peel the decals from the
sheet and attach them to the recessed areas on the optional drawers and the matching trays.
Print a menu settings page to verify the optional tray is installed properly.
Turn the printer on.
a.
4.