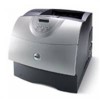
Dell W5300n Dell™ Workgroup Laser Printer W5300 User's Guide - Page 32
To make duplexing the default for all print jobs, Update Now - w5300 driver windows 7
 |
View all Dell W5300n manuals
Add to My Manuals
Save this manual to your list of manuals |
Page 32 highlights
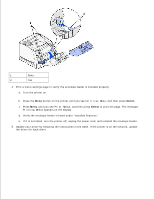
b. c. Press Menu until you see Print Menus, and then press Select to print the page. The message Printing Menus appears on the display. d. Verify the duplex unit is listed under "Installed Features." e. If it is not listed, turn the printer off, unplug the power cord, and reinstall the duplex unit. 3. Update your driver by following the instructions in the table. If the printer is on the network, update the driver for each client. Windows XP Windows 2000 Windows NT 4.0 Windows Me Windows 95/98 1. Click Start Control Panel Printers and Other Hardware Printers and Faxes. 2. Right-click the Dell Laser Printer W5300 icon. 3. Click Properties Device (or Options) Update (or Update Now). 4. Click OK OK. Close the Printers folder. 1. Click Start Settings Printers. 2. Right-click the Dell Laser Printer W5300 icon. 3. Click Properties Device (or Options) Update (or Update Now). 4. Click OK OK. Close the Printers folder. 1. Click Start Settings Printers. 2. Right-click the Dell Laser Printer W5300 icon. 3. Click Properties Device (or Features) Update (or Update Now). 4. Click OK OK. Close the Printers folder. If Update is unavailable, follow these steps: a. In the Available Options list, click Duplex Option. b. Click Add. c. Click OK, and then close the Printers folder. If Update Now is unavailable, follow these steps: a. In the Options list, find Duplex Option. b. Change the setting from Not Installed to Installed. c. Click OK, and then close the Printers folder. To make duplexing the default for all print jobs: You can set up your driver so the printer always duplexes unless you say otherwise for a particular job. This is handy if you usually print on both sides of the page (to save paper, for example). 1.
-
 1
1 -
2
-
3
-
4
-
5
-
6
-
7
-
8
-
9
-
10
-
11
-
12
-
13
-
14
-
15
-
16
-
17
-
18
-
19
-
20
-
21
-
22
-
23
-
24
-
25
-
26
-
 27
27 -
 28
28 -
 29
29 -
 30
30 -
 31
31 -
 32
32 -
 33
33 -
 34
34 -
 35
35 -
 36
36 -
 37
37 -
38
-
39
-
40
-
41
-
42
-
43
-
44
-
45
-
46
-
47
-
48
-
49
-
50
-
51
-
52
-
53
-
54
-
55
-
56
-
57
-
58
-
59
-
60
-
61
-
62
-
63
-
64
-
65
-
66
-
67
-
68
-
69
-
70
-
71
-
72
-
73
-
74
-
75
-
76
-
77
-
78
-
79
-
80
-
81
-
82
-
83
-
84
-
85
-
86
-
87
-
88
-
89
-
90
-
91
-
92
-
93
-
94
-
95
-
96
-
97
-
98
-
99
-
100
-
101
-
102
-
103
-
104
-
105
-
106
-
107
-
108
-
109
-
110
-
111
-
112
-
113
-
114
-
115
-
116
-
117
-
118
-
119
-
120
-
121
-
122
-
123
-
124
-
125
-
126
-
127
-
128
-
129
-
130
-
131
-
132
-
133
-
134
-
135
-
136
-
137
-
138
-
139
-
140
-
141
-
142
-
143
-
144
-
145
-
146
-
147
-
148
-
149
-
150
-
151
-
152
-
153
-
154
-
155
-
156
-
157
-
158
-
159
-
160
-
161
-
162
-
163
-
164
-
165
-
166
-
167
-
168
-
169
-
170
-
171
-
172
-
173
-
174
-
175
-
176
-
177
-
178
-
179
-
180
-
181
-
182
-
183
-
184
-
185
-
186
-
187
-
188
-
189
-
190
-
191
-
192
-
193
-
194
-
195
-
196
-
197
-
198
-
199
-
200
-
201
-
202
-
203
-
204
-
205
-
206
-
207
-
208
-
209
-
210
-
211
-
212
-
213
-
214
-
215
-
216
-
217
-
218
-
219
-
220
-
221
-
222
-
223
-
224
-
225
-
226
-
227
-
228
-
229
-
230
-
231
-
232
 |
 |
