Dell XPS /Dimension Gen 5 Owner's Manual - Page 104
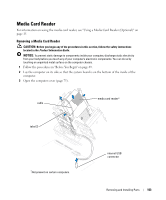
Installing a Media Card Reader
 |
View all Dell XPS /Dimension Gen 5 manuals
Add to My Manuals
Save this manual to your list of manuals |
Page 104 highlights
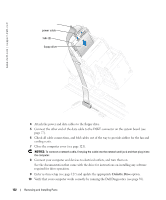
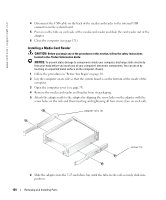
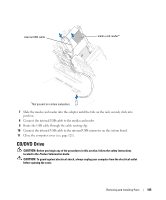
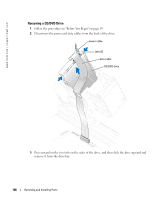
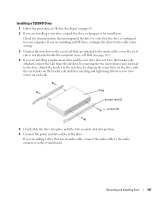
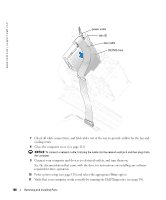
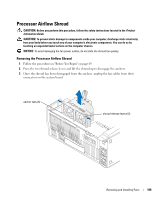
www.dell.com | support.dell.com 4 Disconnect the USB cable on the back of the media card reader to the internal USB connector on the system board. 5 Press in on the tabs on each side of the media card reader and slide the card reader out of the adapter. 6 Close the computer (see page 121). Installing a Media Card Reader CAUTION: Before you begin any of the procedures in this section, follow the safety instructions located in the Product Information Guide. NOTICE: To prevent static damage to components inside your computer, discharge static electricity from your body before you touch any of your computer's electronic components. You can do so by touching an unpainted metal surface on the computer chassis. 1 Follow the procedures in "Before You Begin" on page 69. 2 Lay the computer on its side so that the system board is on the bottom of the inside of the computer. 3 Open the computer cover (see page 75). 4 Remove the media card reader and bracket from its packaging. 5 Attach the adapter rails to the adapter by aligning the screw holes on the adapter with the screw holes on the rails and then inserting and tightening all four screws (two on each rail). adapter rails (2) screws (4) 6 Slide the adapter into the 5.25-inch drive bay until the tabs on the rails securely click into position. 104 Removing and Installing Parts
-
 1
1 -
2
-
3
-
4
-
5
-
6
-
7
-
8
-
9
-
10
-
11
-
12
-
13
-
14
-
15
-
16
-
17
-
18
-
19
-
20
-
21
-
22
-
23
-
24
-
25
-
26
-
27
-
28
-
29
-
30
-
31
-
32
-
33
-
34
-
35
-
36
-
37
-
38
-
39
-
40
-
41
-
42
-
43
-
44
-
45
-
46
-
47
-
48
-
49
-
50
-
51
-
52
-
53
-
54
-
55
-
56
-
57
-
58
-
59
-
60
-
61
-
62
-
63
-
64
-
65
-
66
-
67
-
68
-
69
-
70
-
71
-
72
-
73
-
74
-
75
-
76
-
77
-
78
-
79
-
80
-
81
-
82
-
83
-
84
-
85
-
86
-
87
-
88
-
89
-
90
-
91
-
92
-
93
-
94
-
95
-
96
-
97
-
98
-
 99
99 -
 100
100 -
 101
101 -
 102
102 -
 103
103 -
 104
104 -
 105
105 -
 106
106 -
 107
107 -
 108
108 -
 109
109 -
110
-
111
-
112
-
113
-
114
-
115
-
116
-
117
-
118
-
119
-
120
-
121
-
122
-
123
-
124
-
125
-
126
-
127
-
128
-
129
-
130
-
131
-
132
-
133
-
134
-
135
-
136
-
137
-
138
-
139
-
140
-
141
-
142
-
143
-
144
-
145
-
146
-
147
-
148
-
149
-
150
-
151
-
152
-
153
-
154
-
155
-
156
-
157
-
158
-
159
-
160
-
161
-
162
 |
 |