Dell XPS /Dimension Gen 5 Owner's Manual - Page 128
Entering System Setup, Options List, Option Field, Key Functions, Option, Field
 |
View all Dell XPS /Dimension Gen 5 manuals
Add to My Manuals
Save this manual to your list of manuals |
Page 128 highlights
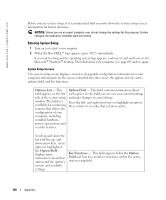
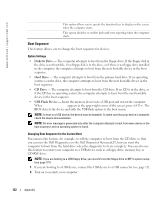
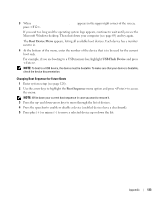
www.dell.com | support.dell.com Before you use system setup, it is recommended that you write down the system setup screen information for future reference. NOTICE: Unless you are an expert computer user, do not change the settings for this program. Certain changes can make your computer work incorrectly. Entering System Setup 1 Turn on (or restart) your computer. 2 When the blue DELL™ logo appears, press immediately. If you wait too long and the operating system logo appears, continue to wait until you see the Microsoft® Windows® desktop. Then shut down your computer (see page 69) and try again. System Setup Screens The system setup screen displays current or changeable configuration information for your computer. Information on the screen is divided into three areas: the options list, the active options field, and key functions. Options List - This field appears on the left side of the system setup window. The field is a scrollable list containing features that define the configuration of your computer, including installed hardware, power conservation, and security features. Option Field - This field contains information about each option. In this field you can view your current settings and make changes to your settings. Press the left- and right-arrow keys to highlight an option. Press to make that selection active. Scroll up and down the list with the up- and down-arrow keys. As an option is highlighted, the Option Field displays more information about that option and the option's current and available settings. Key Functions - This field appears below the Option Field and lists keys and their functions within the active system setup field. 128 Appendix
-
 1
1 -
2
-
3
-
4
-
5
-
6
-
7
-
8
-
9
-
10
-
11
-
12
-
13
-
14
-
15
-
16
-
17
-
18
-
19
-
20
-
21
-
22
-
23
-
24
-
25
-
26
-
27
-
28
-
29
-
30
-
31
-
32
-
33
-
34
-
35
-
36
-
37
-
38
-
39
-
40
-
41
-
42
-
43
-
44
-
45
-
46
-
47
-
48
-
49
-
50
-
51
-
52
-
53
-
54
-
55
-
56
-
57
-
58
-
59
-
60
-
61
-
62
-
63
-
64
-
65
-
66
-
67
-
68
-
69
-
70
-
71
-
72
-
73
-
74
-
75
-
76
-
77
-
78
-
79
-
80
-
81
-
82
-
83
-
84
-
85
-
86
-
87
-
88
-
89
-
90
-
91
-
92
-
93
-
94
-
95
-
96
-
97
-
98
-
99
-
100
-
101
-
102
-
103
-
104
-
105
-
106
-
107
-
108
-
109
-
110
-
111
-
112
-
113
-
114
-
115
-
116
-
117
-
118
-
119
-
120
-
121
-
122
-
 123
123 -
 124
124 -
 125
125 -
 126
126 -
 127
127 -
 128
128 -
 129
129 -
 130
130 -
 131
131 -
 132
132 -
 133
133 -
134
-
135
-
136
-
137
-
138
-
139
-
140
-
141
-
142
-
143
-
144
-
145
-
146
-
147
-
148
-
149
-
150
-
151
-
152
-
153
-
154
-
155
-
156
-
157
-
158
-
159
-
160
-
161
-
162
 |
 |