Dell XPS One 2720 XPS 27 2720 Owners Manual - Page 50
Replacing the Inner Frame, Procedure, Postrequisites
 |
View all Dell XPS One 2720 manuals
Add to My Manuals
Save this manual to your list of manuals |
Page 50 highlights
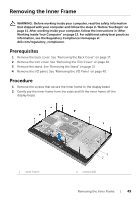
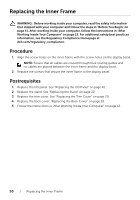
Replacing the Inner Frame WARNING: Before working inside your computer, read the safety information that shipped with your computer and follow the steps in "Before You Begin" on page 11. After working inside your computer, follow the instructions in "After Working Inside Your Computer" on page 13. For additional safety best practices information, see the Regulatory Compliance Homepage at dell.com/regulatory_compliance. Procedure 1 Align the screw holes on the inner frame with the screw holes on the display bezel. NOTE: Ensure that all cables are routed through their routing guides and no cables are placed between the inner frame and the display bezel. 2 Replace the screws that secure the inner frame to the display bezel. Postrequisites 1 Replace the I/O panel. See "Replacing the I/O Panel" on page 41. 2 Replace the stand. See "Replacing the Stand" on page 22. 3 Replace the trim cover. See "Replacing the Trim Cover" on page 20. 4 Replace the back cover. "Replacing the Back Cover" on page 18. 5 Follow the instructions in "After Working Inside Your Computer" on page 13. 50 | Replacing the Inner Frame
-
 1
1 -
2
-
3
-
4
-
5
-
6
-
7
-
8
-
9
-
10
-
11
-
12
-
13
-
14
-
15
-
16
-
17
-
18
-
19
-
20
-
21
-
22
-
23
-
24
-
25
-
26
-
27
-
28
-
29
-
30
-
31
-
32
-
33
-
34
-
35
-
36
-
37
-
38
-
39
-
40
-
41
-
42
-
43
-
44
-
 45
45 -
 46
46 -
 47
47 -
 48
48 -
 49
49 -
 50
50 -
 51
51 -
 52
52 -
 53
53 -
 54
54 -
 55
55 -
56
-
57
-
58
-
59
-
60
-
61
-
62
-
63
-
64
-
65
-
66
-
67
-
68
-
69
-
70
-
71
-
72
-
73
-
74
-
75
-
76
-
77
-
78
-
79
-
80
-
81
-
82
-
83
-
84
-
85
-
86
-
87
-
88
-
89
-
90
-
91
-
92
-
93
-
94
-
95
-
96
-
97
-
98
-
99
-
100
-
101
-
102
-
103
-
104
-
105
-
106
-
107
-
108
-
109
-
110
-
111
-
112
-
113
-
114
-
115
-
116
-
117
 |
 |